Postfix配置手册
snow chuai汇总、整理、撰写---2020/2/24
1. 安装与配置Postfix------SMTP服务
1) 安装Postfix [root@srv1 ~]# yum install postfix -y |
2. 安装与配置Dovecot-----POP/IMAP服务
1) 安装Dovecot [root@srv1 ~]# yum install dovecot -y |
3. 添加邮件账户---系统账户
1) 安装邮件客户端 [root@srv1 ~]# yum install mailx -y |
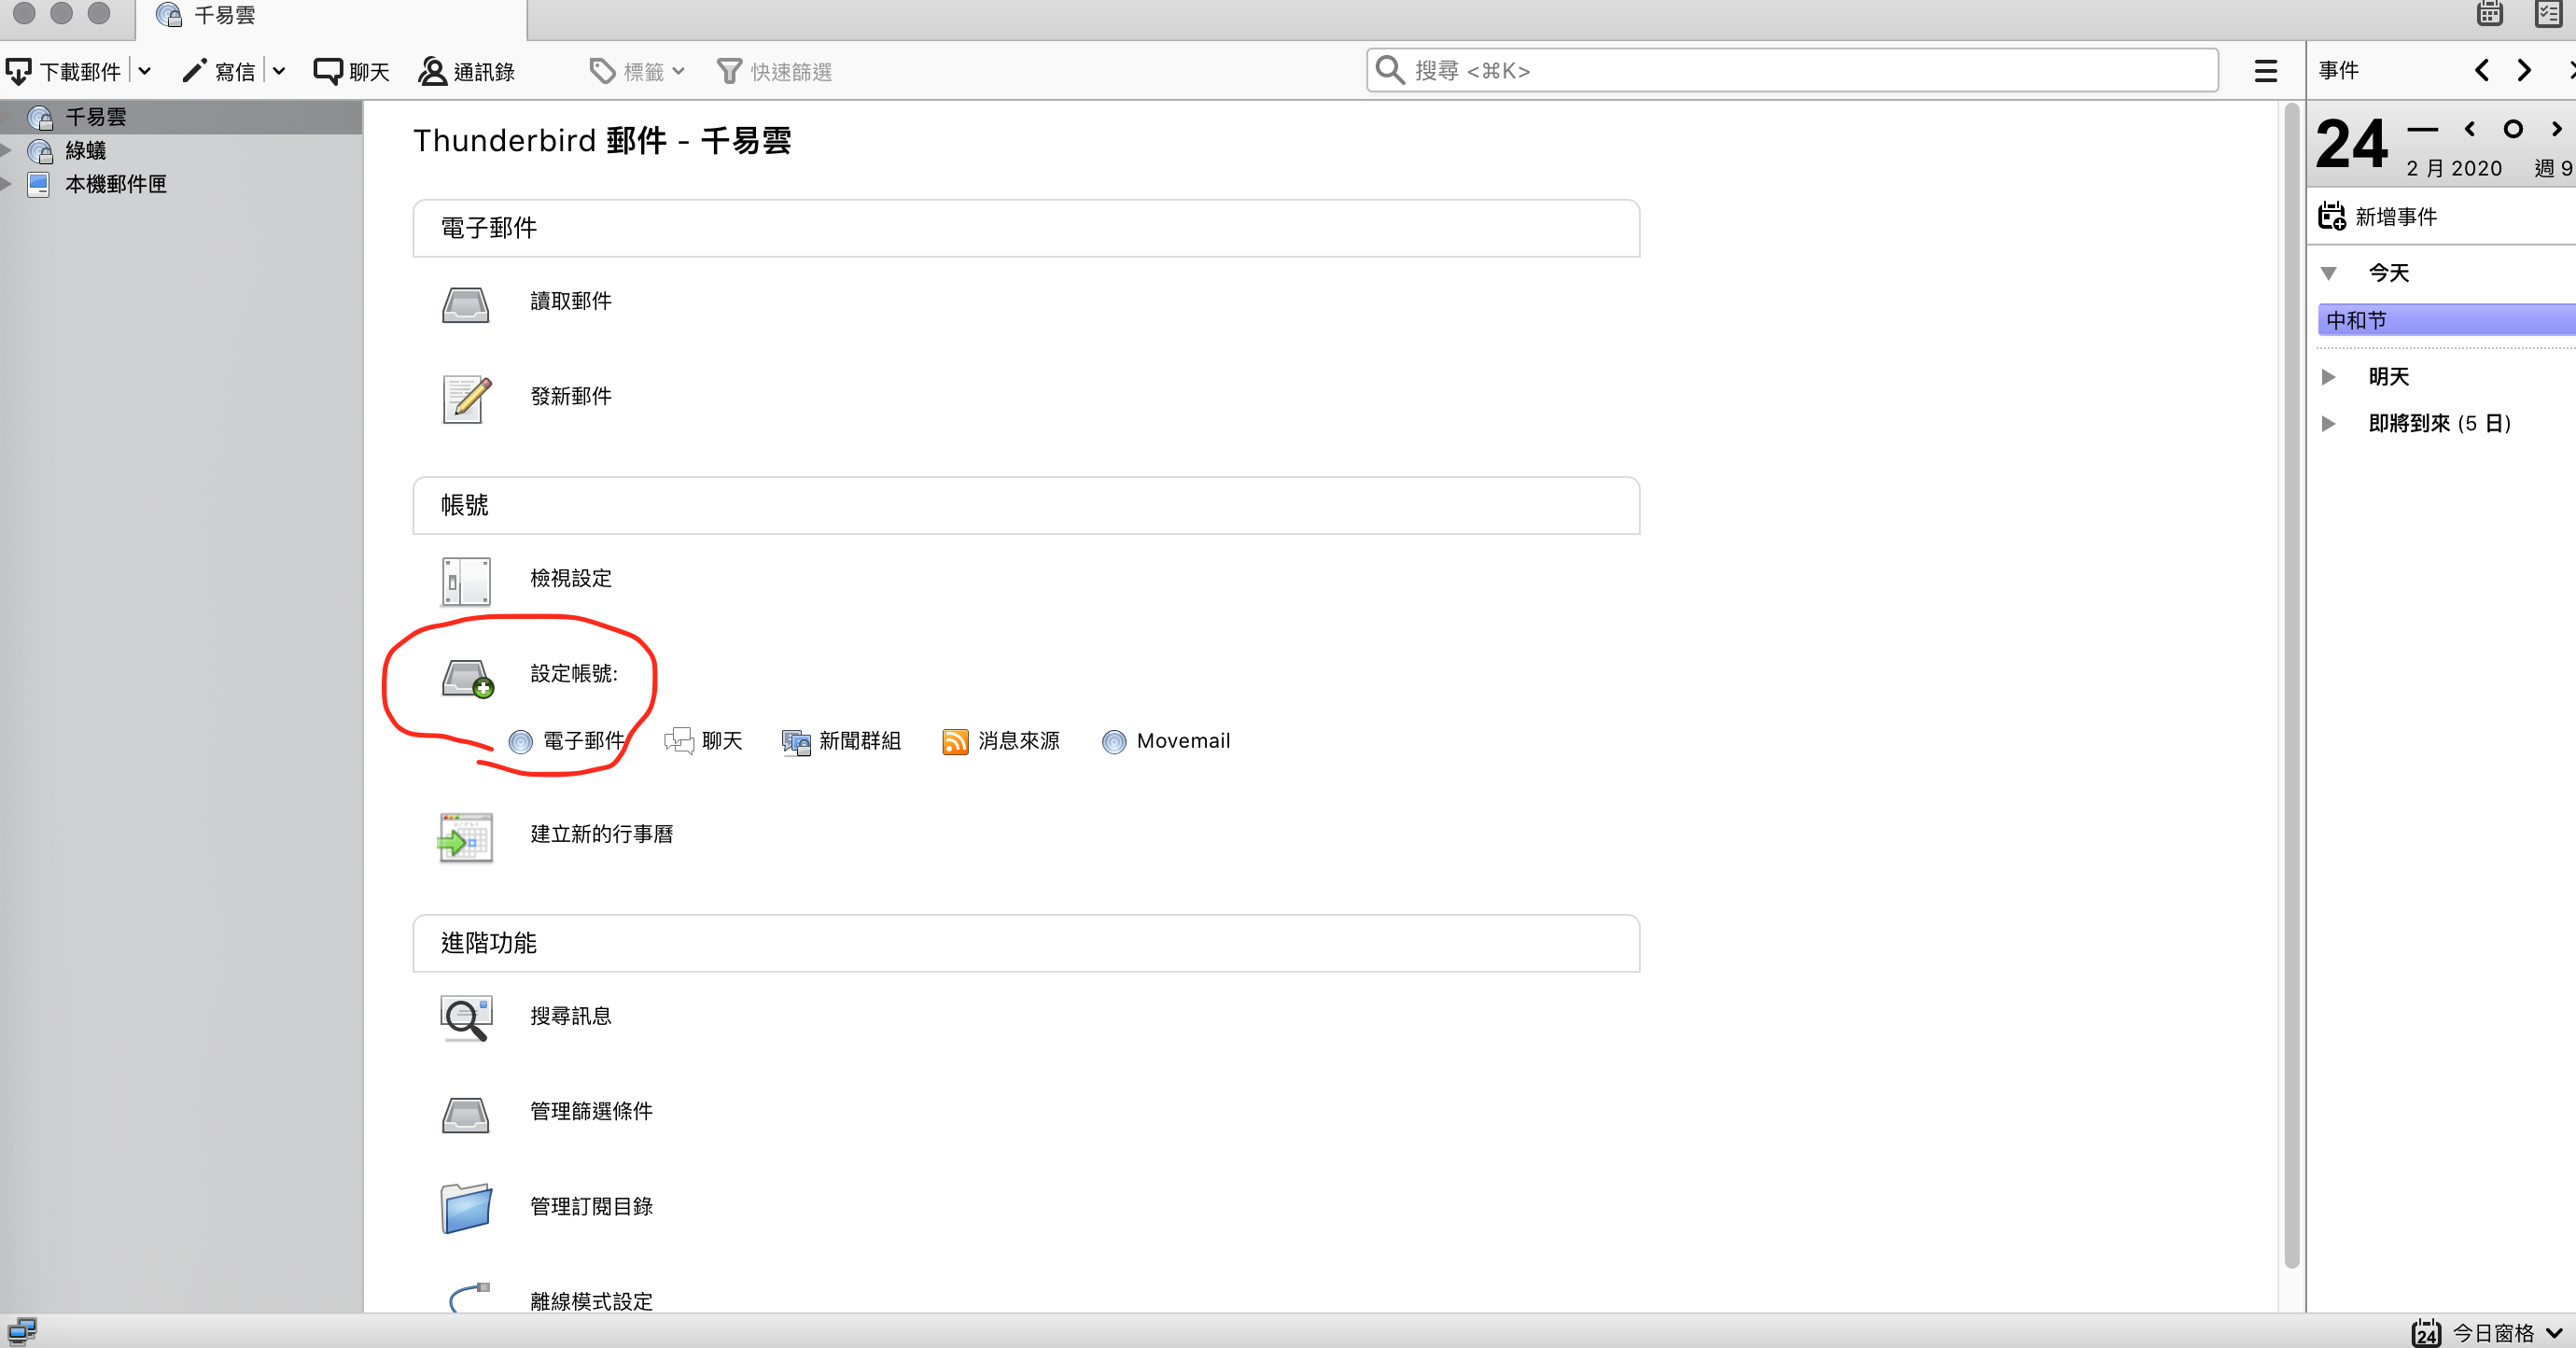
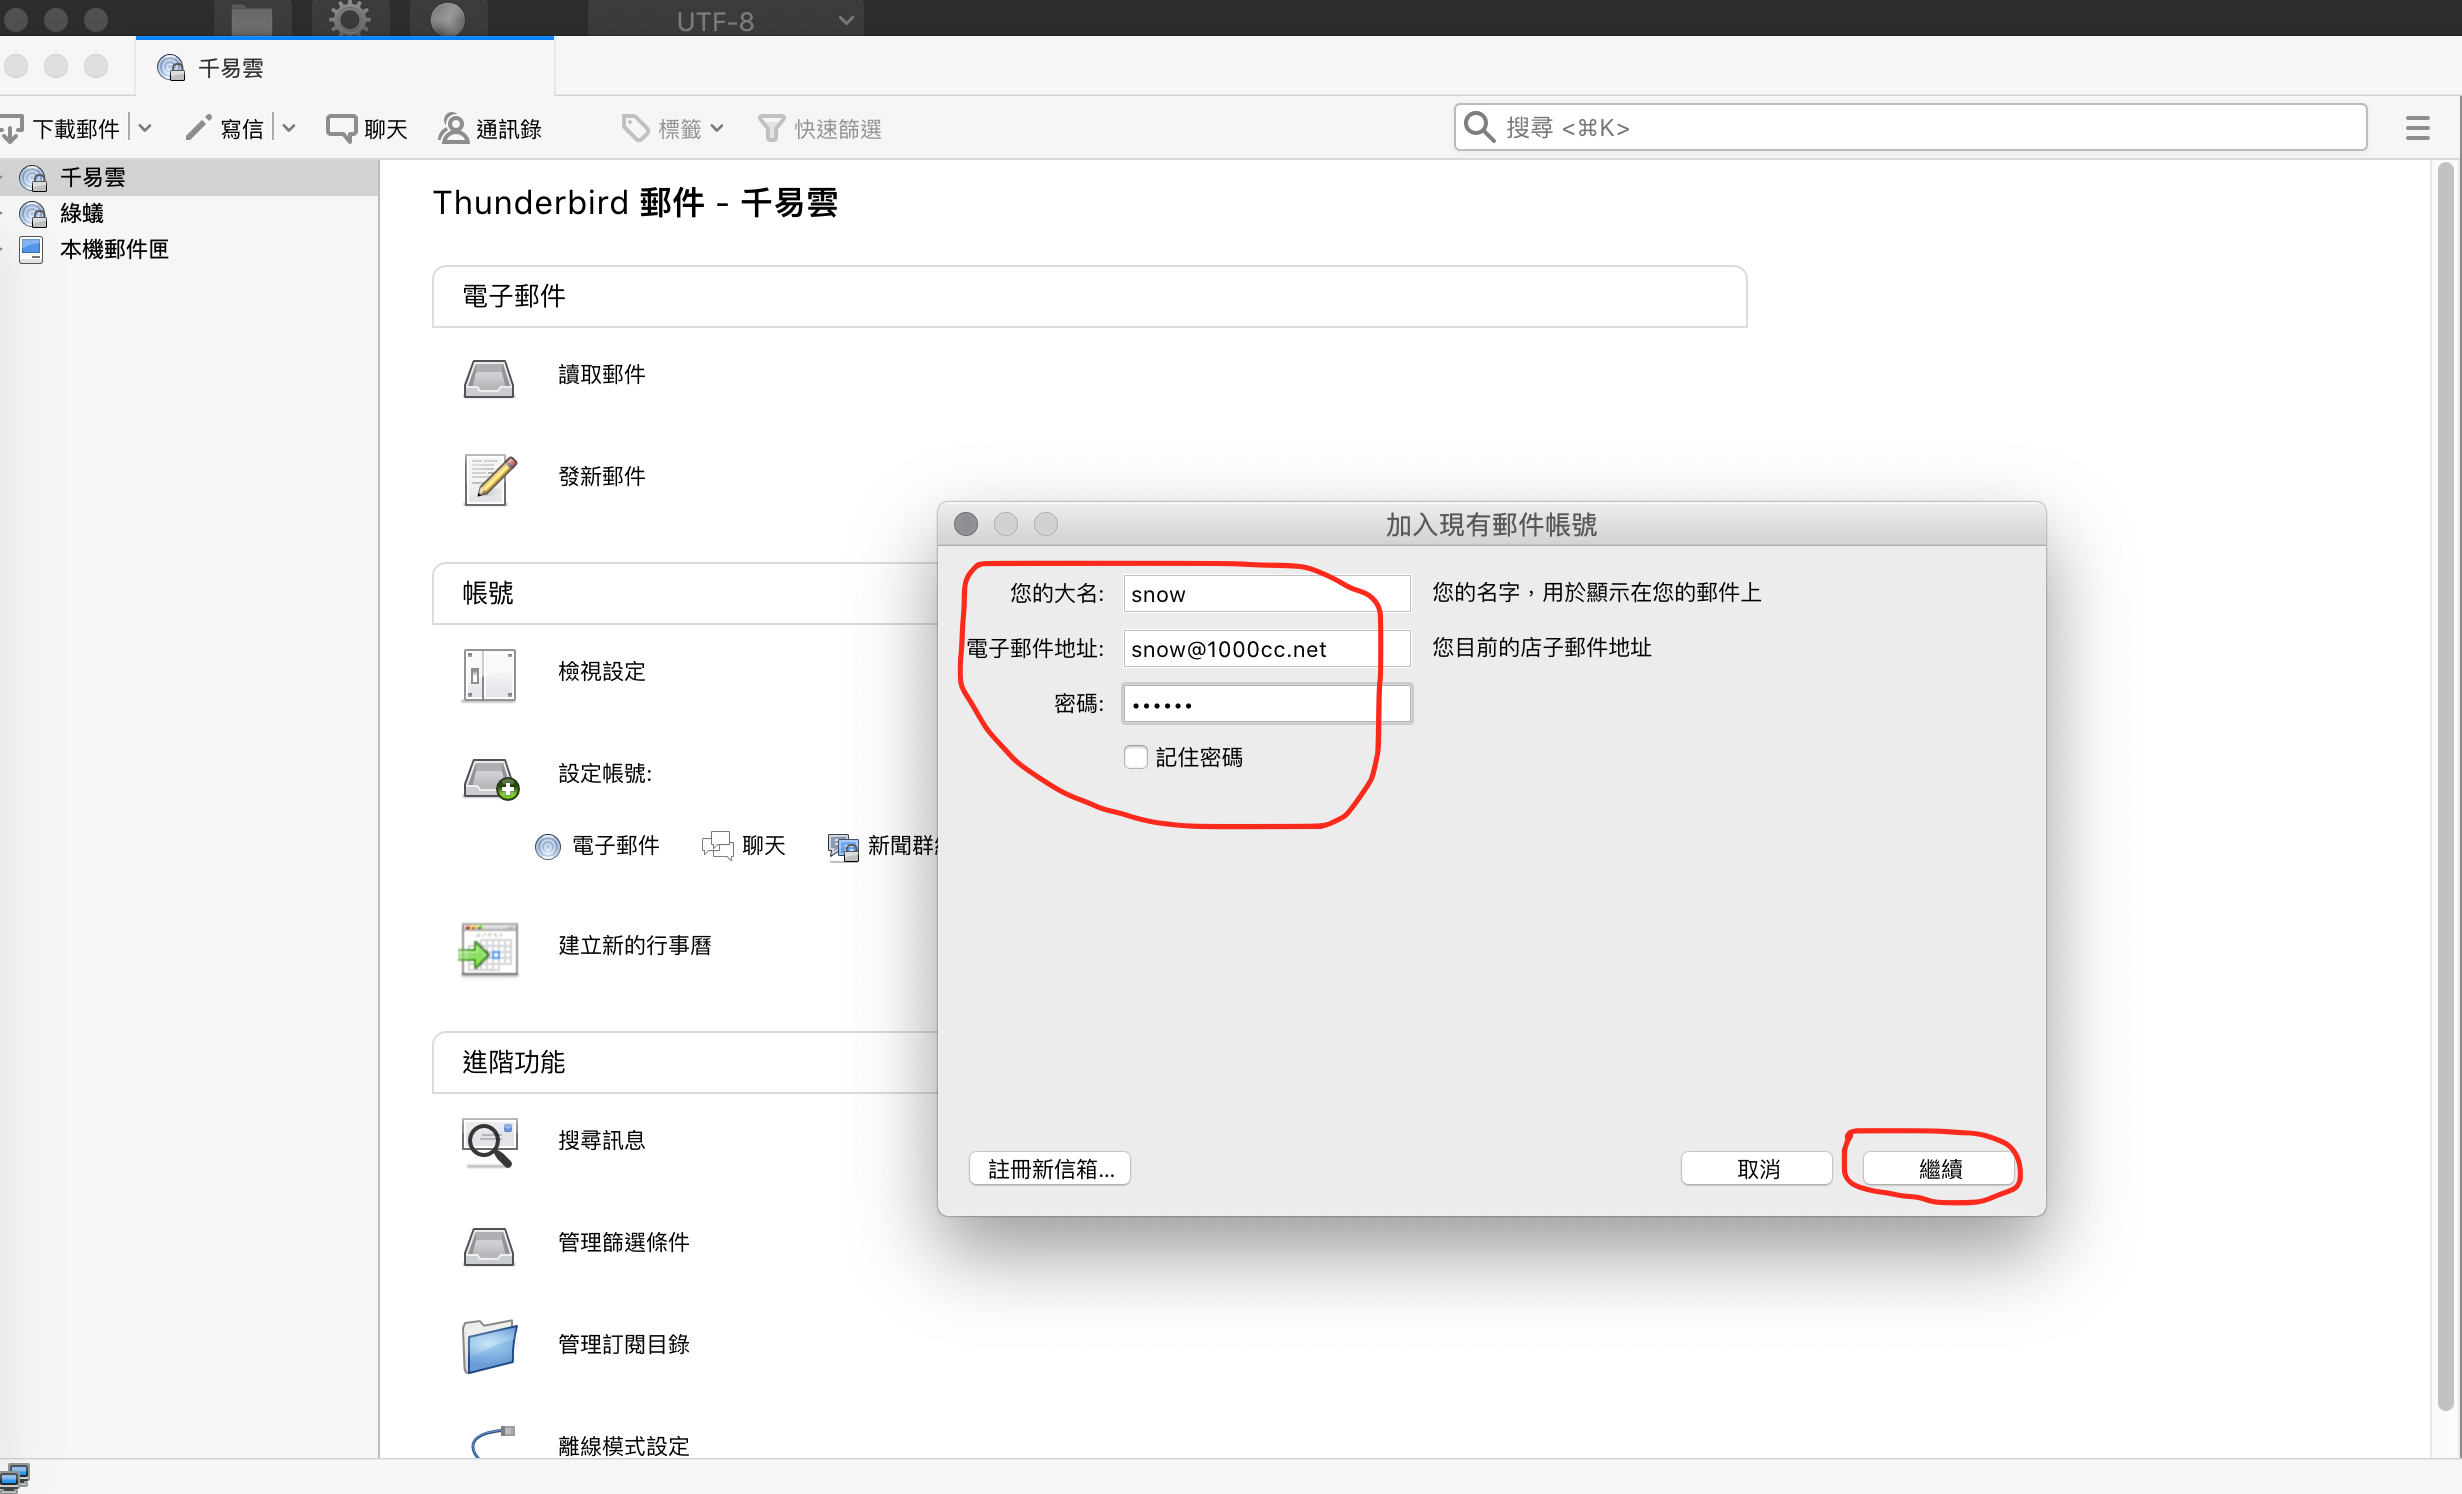
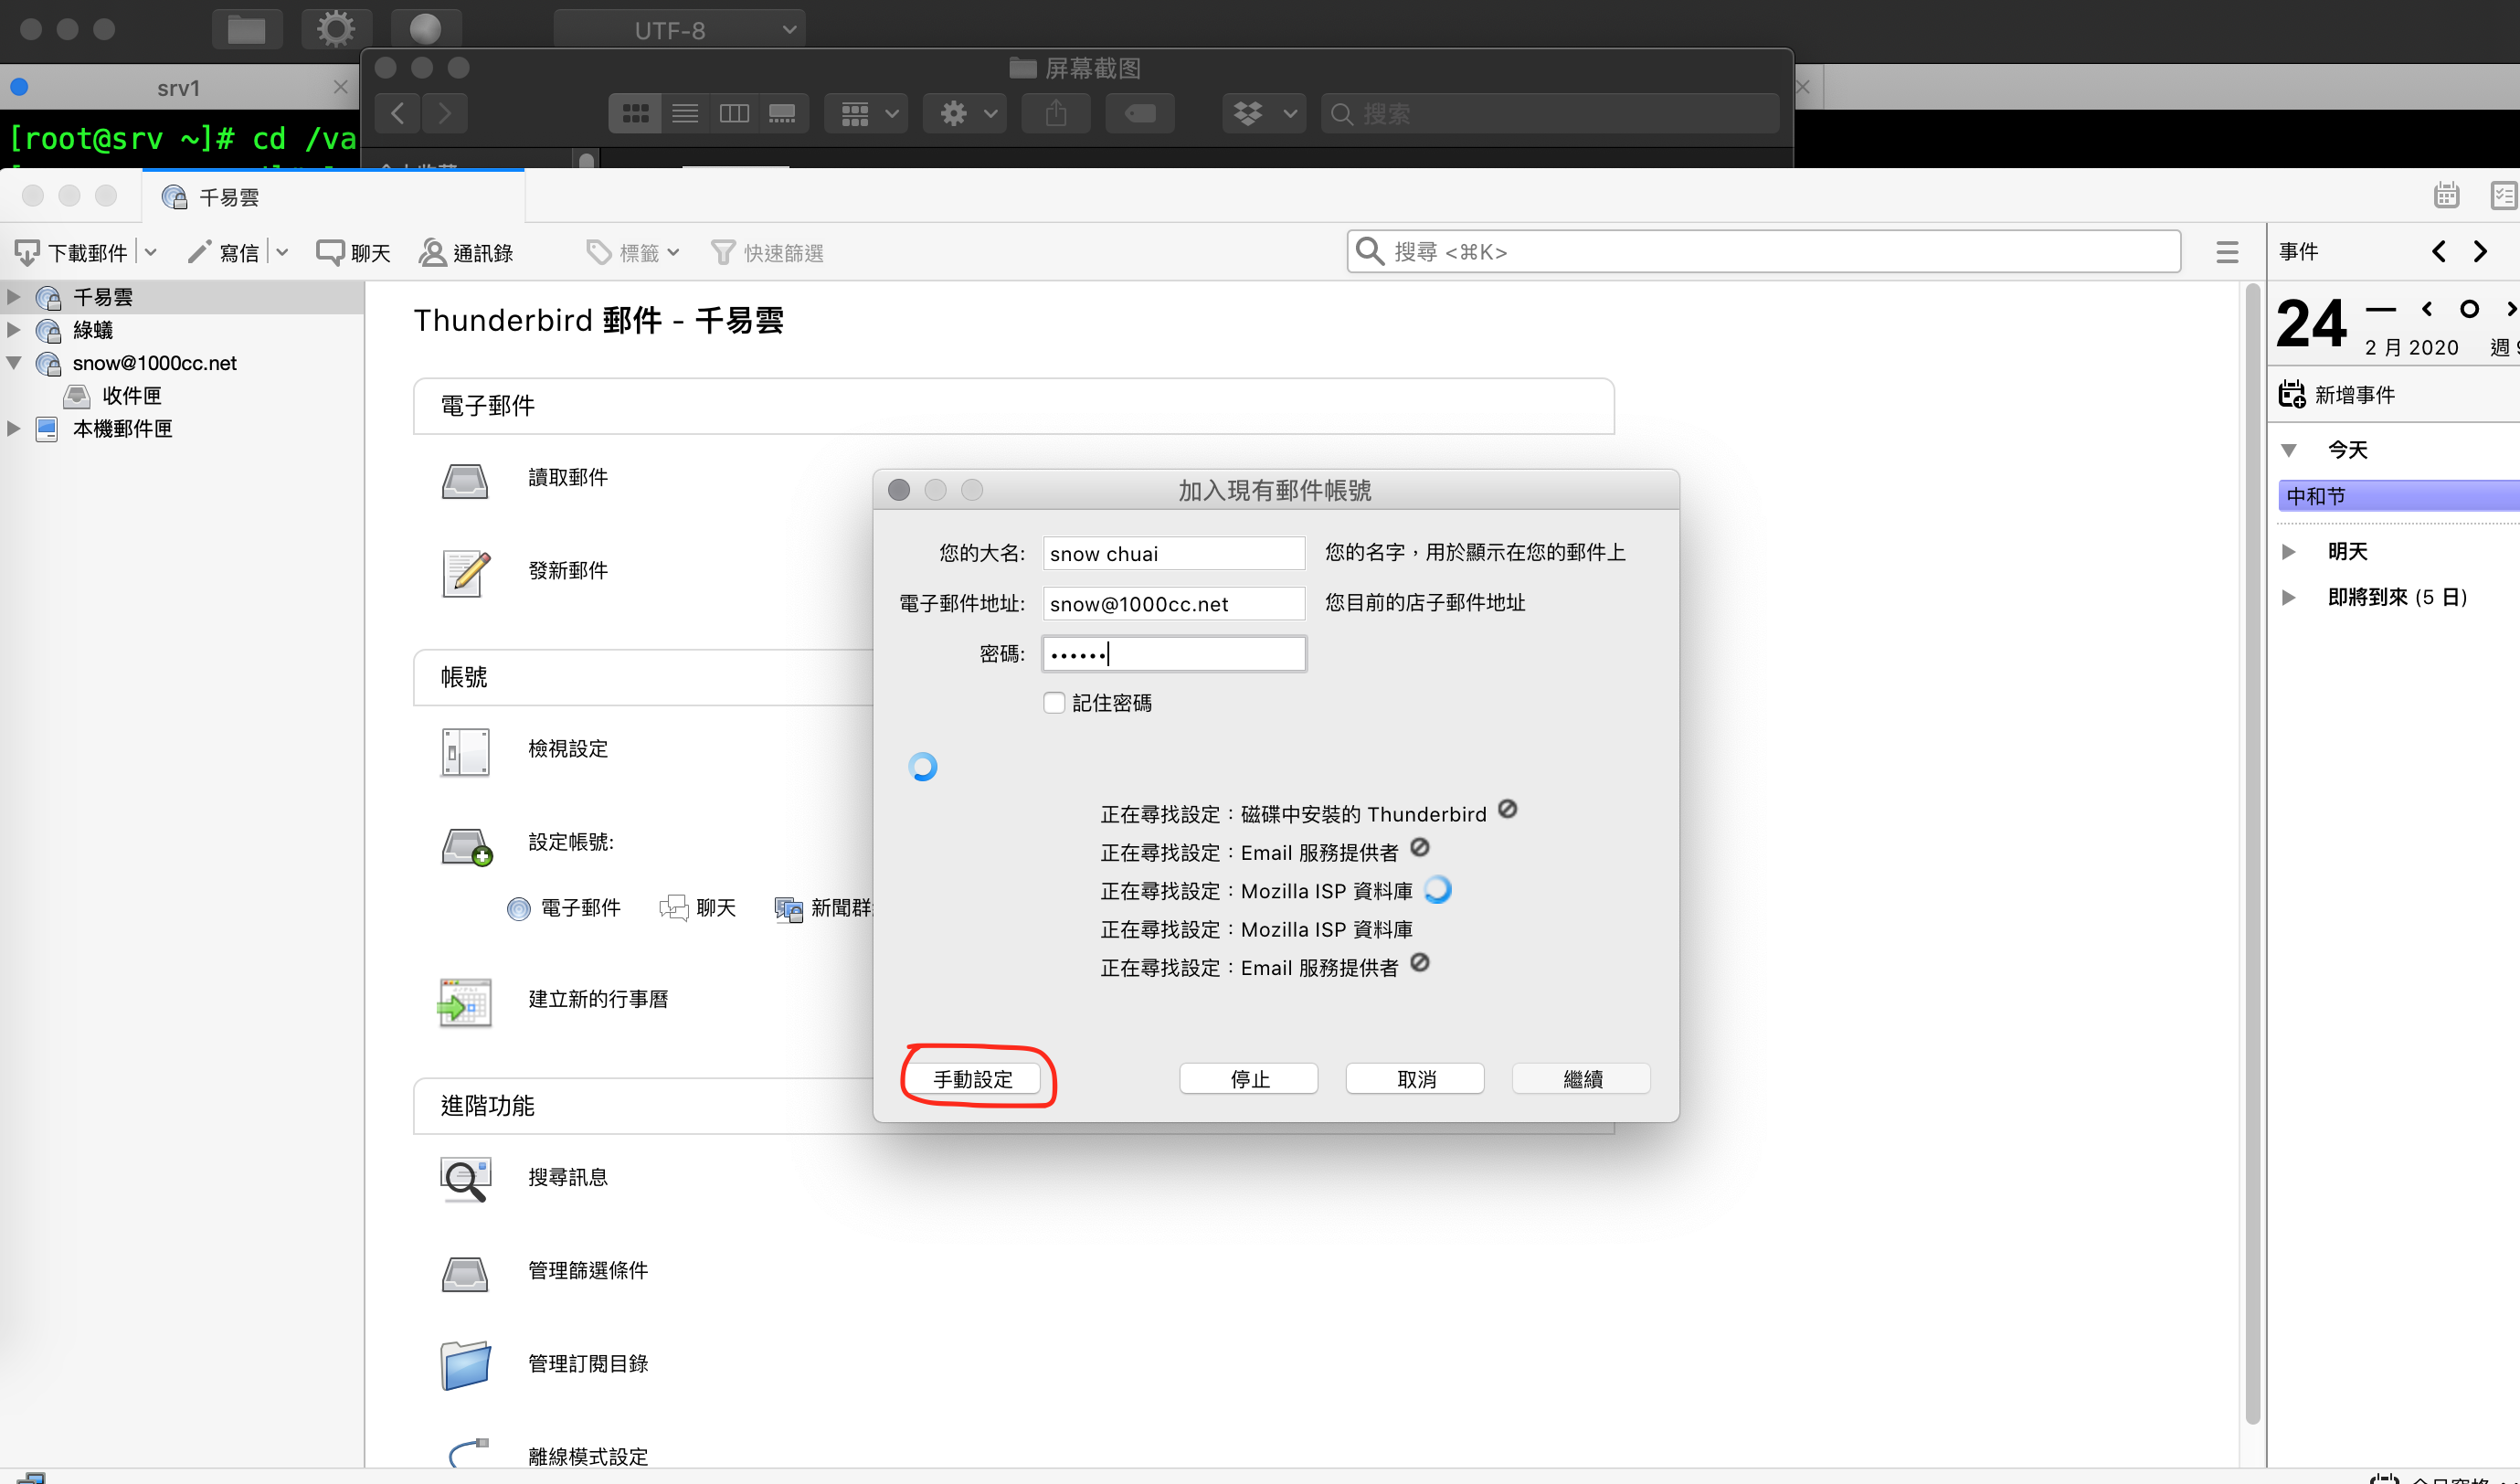
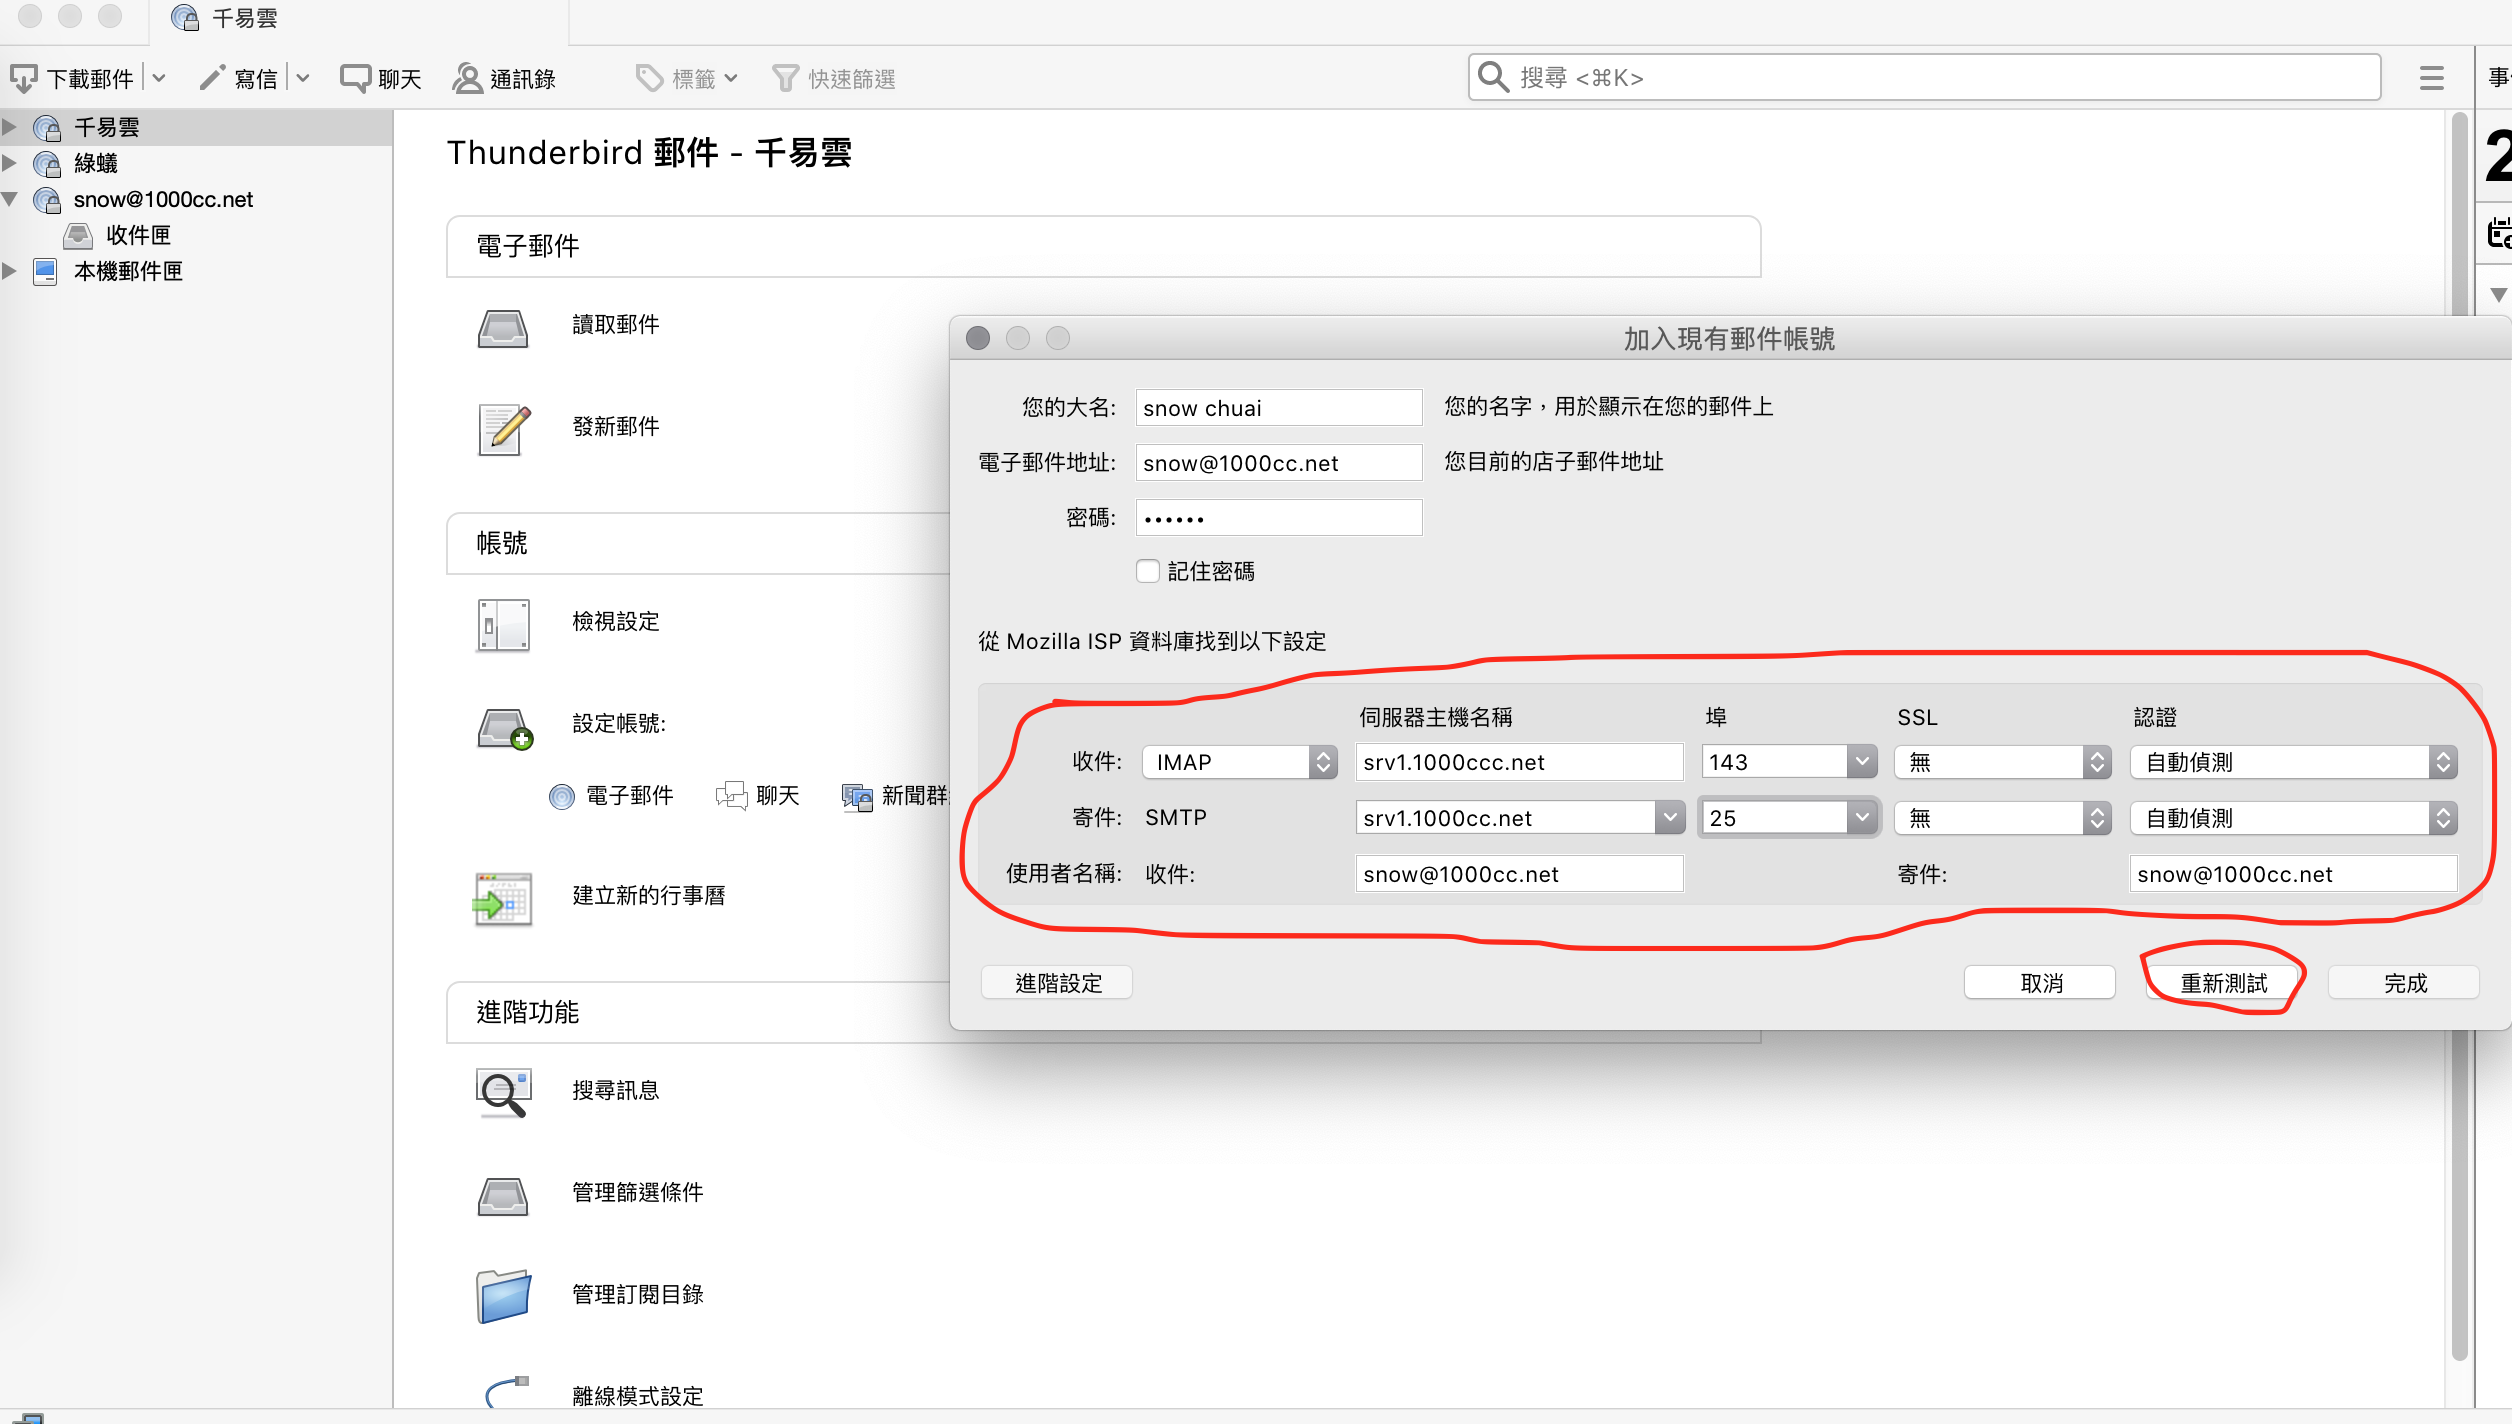
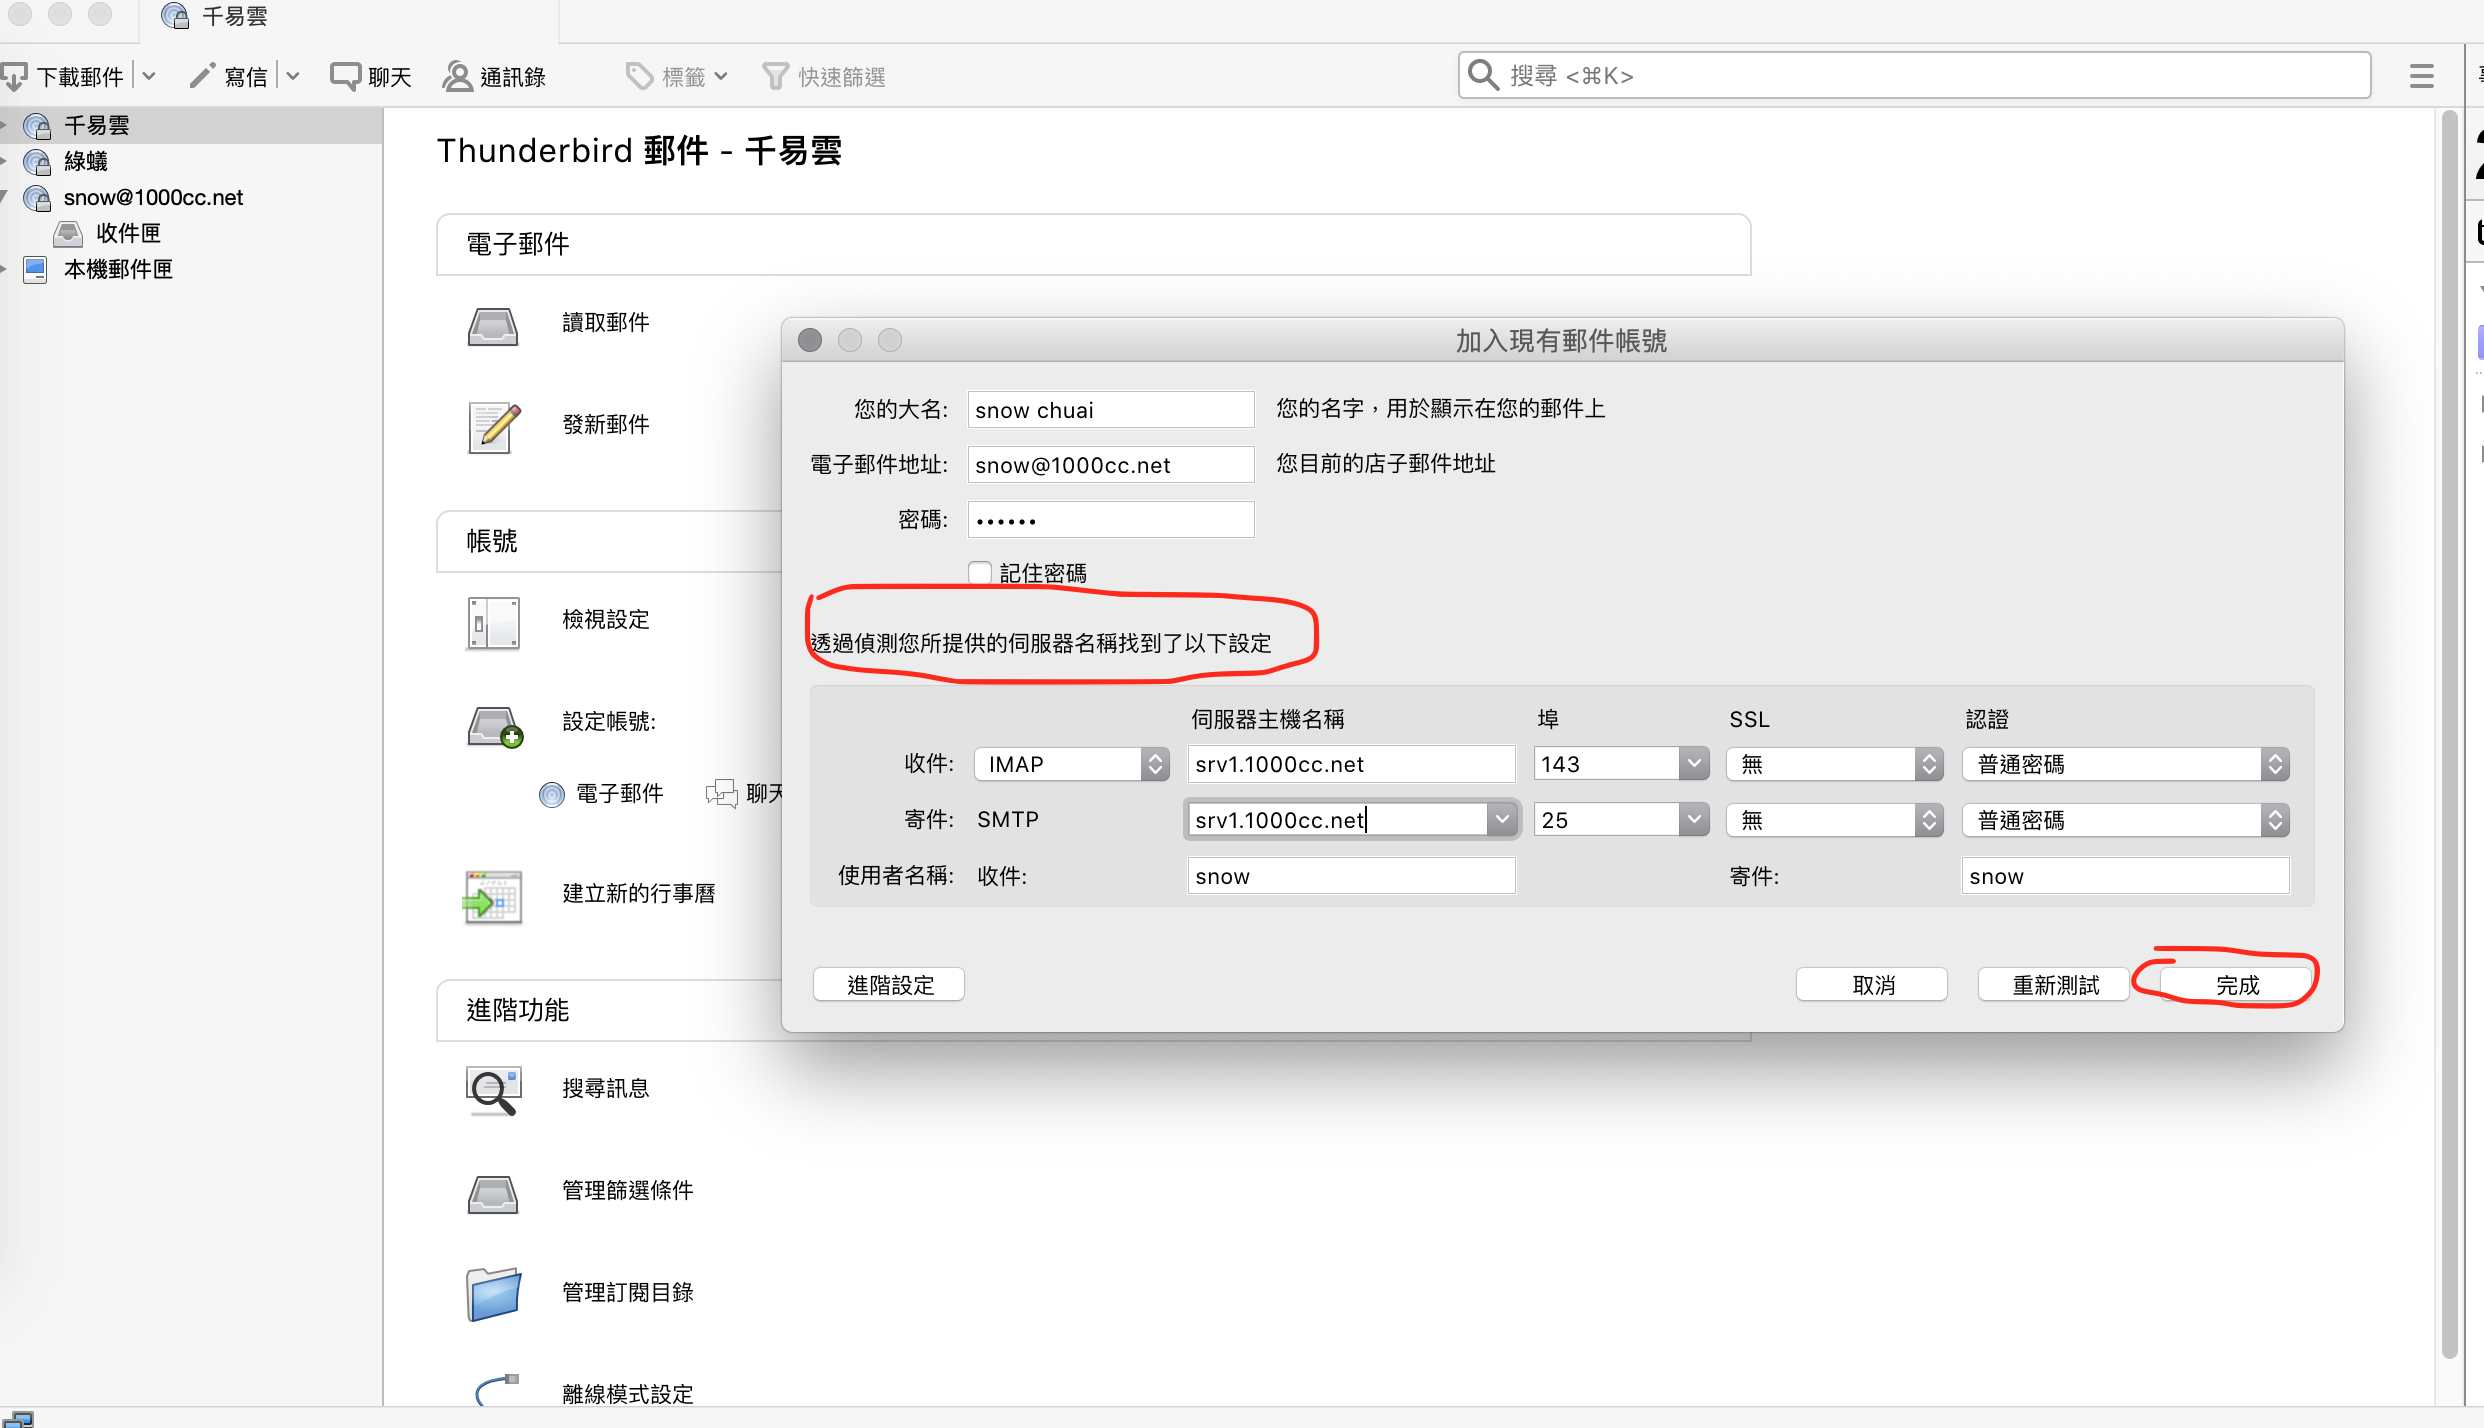
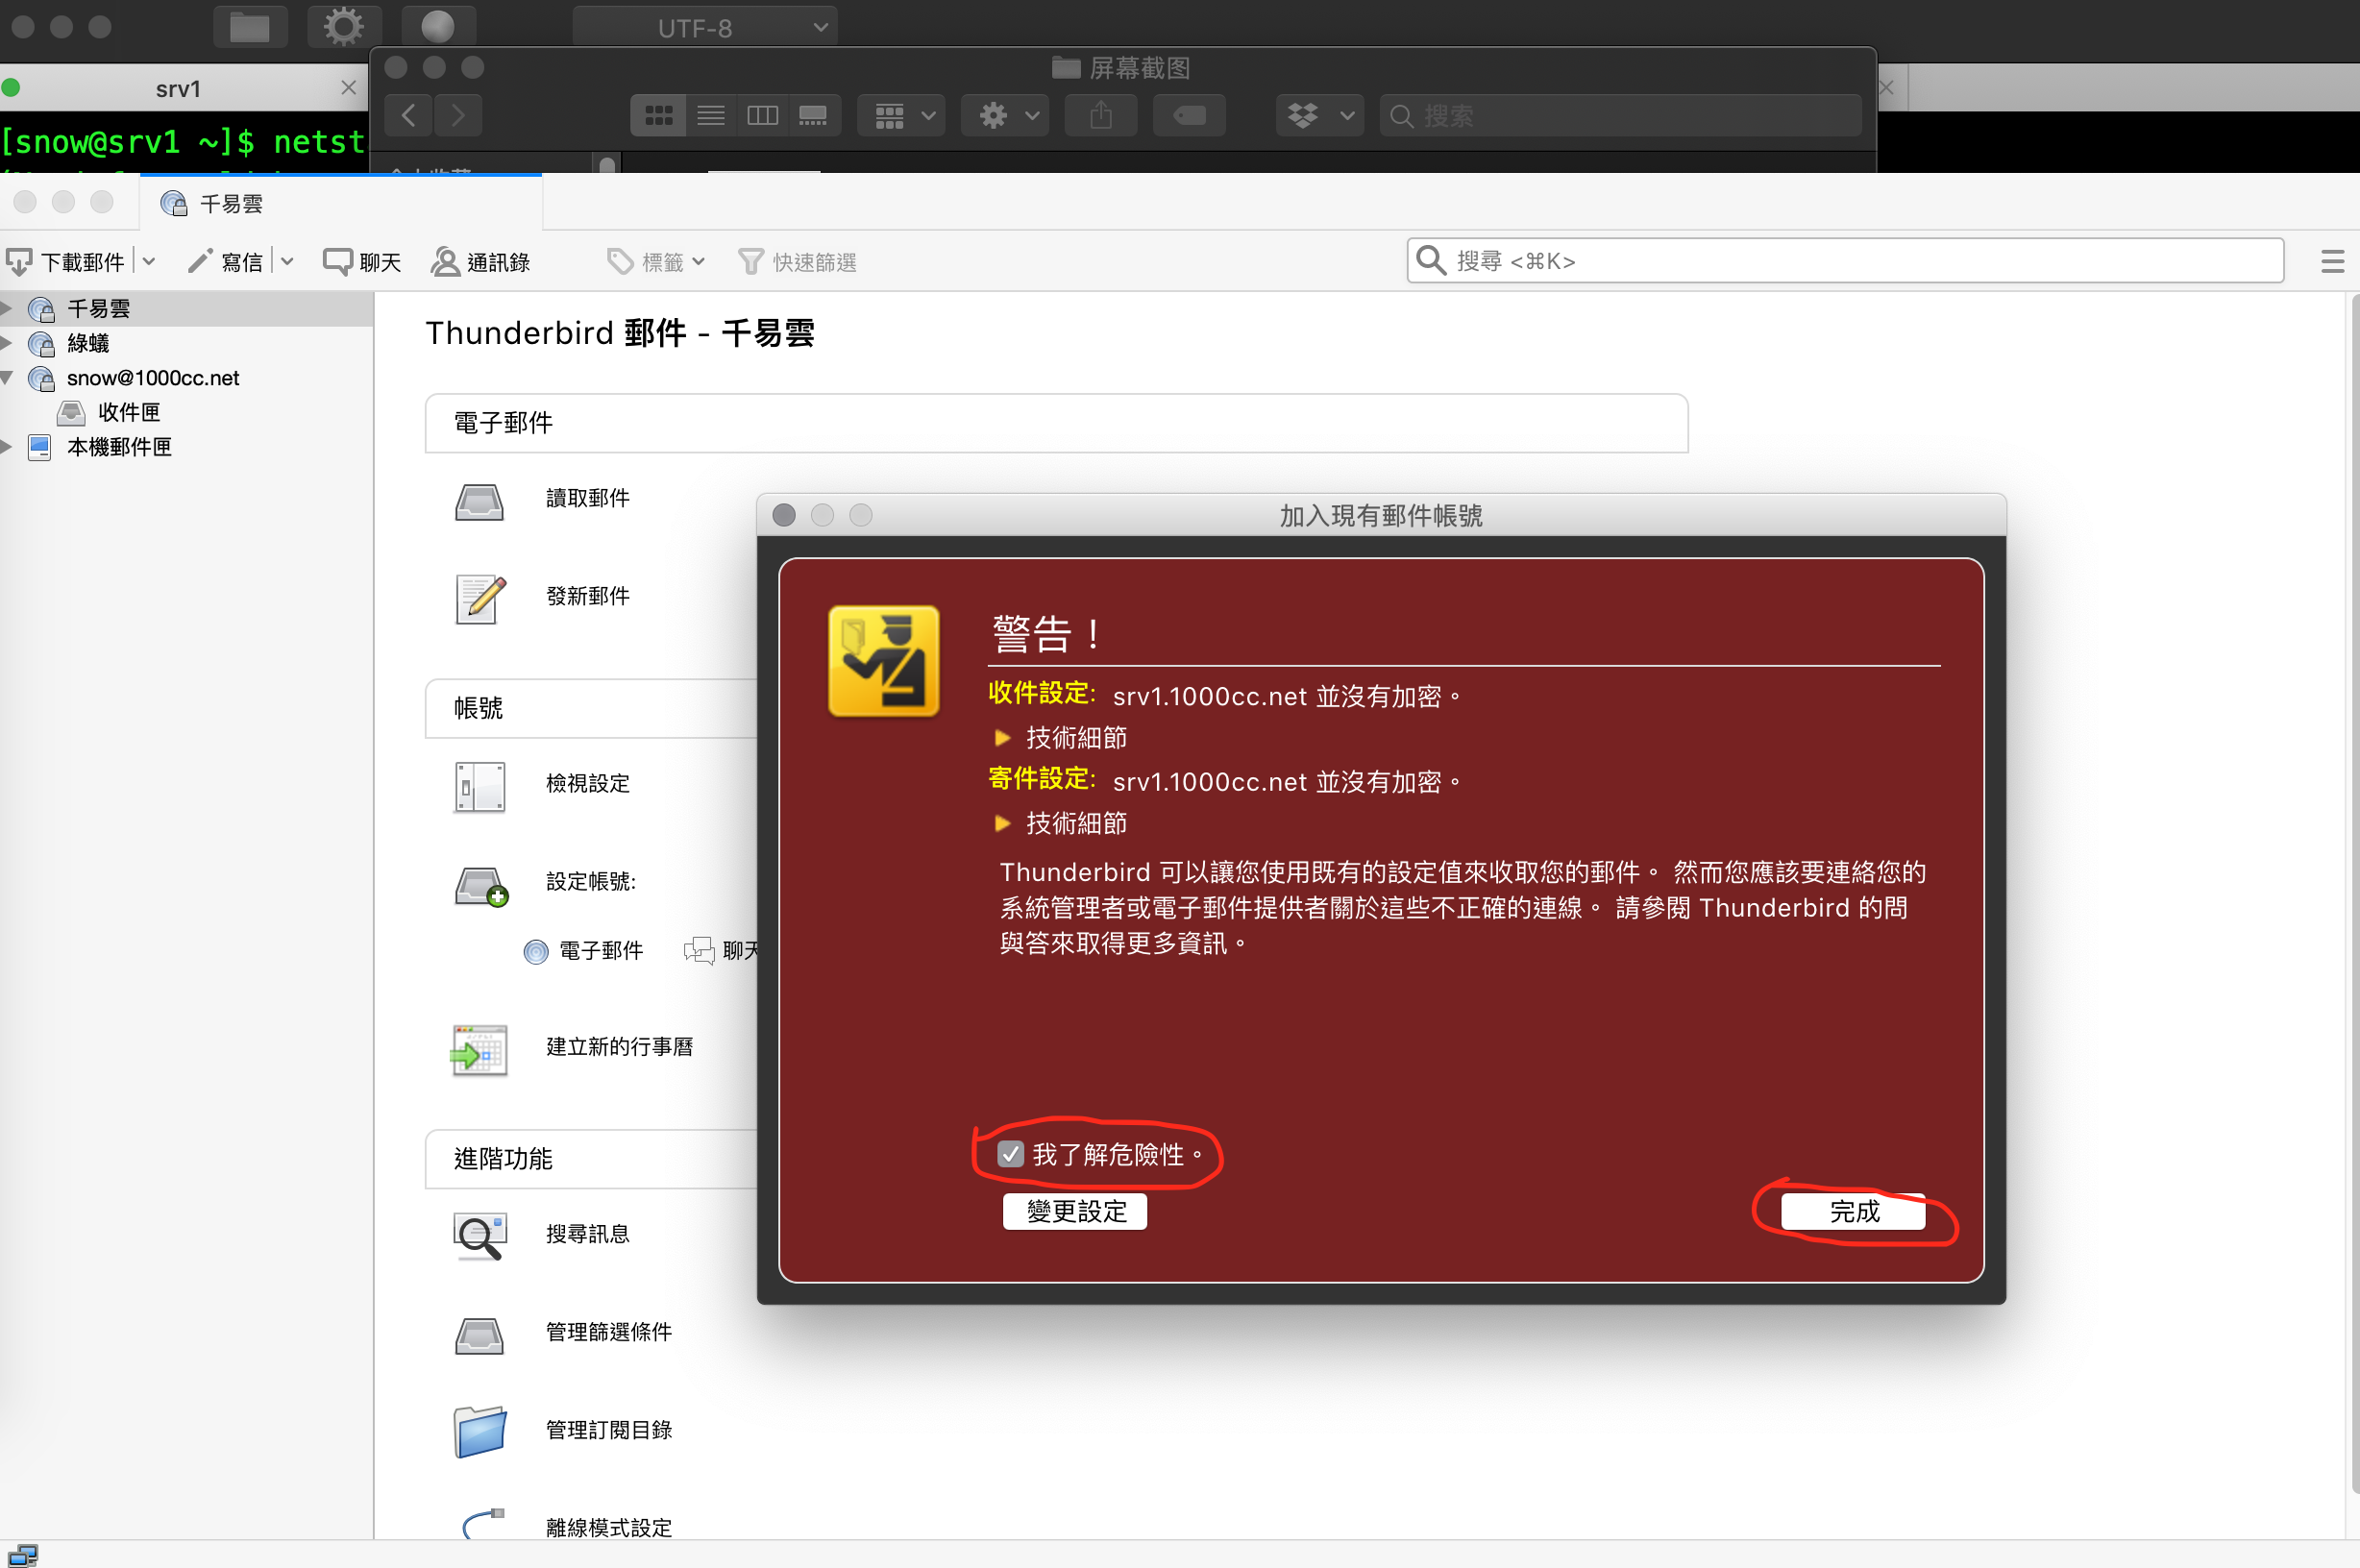
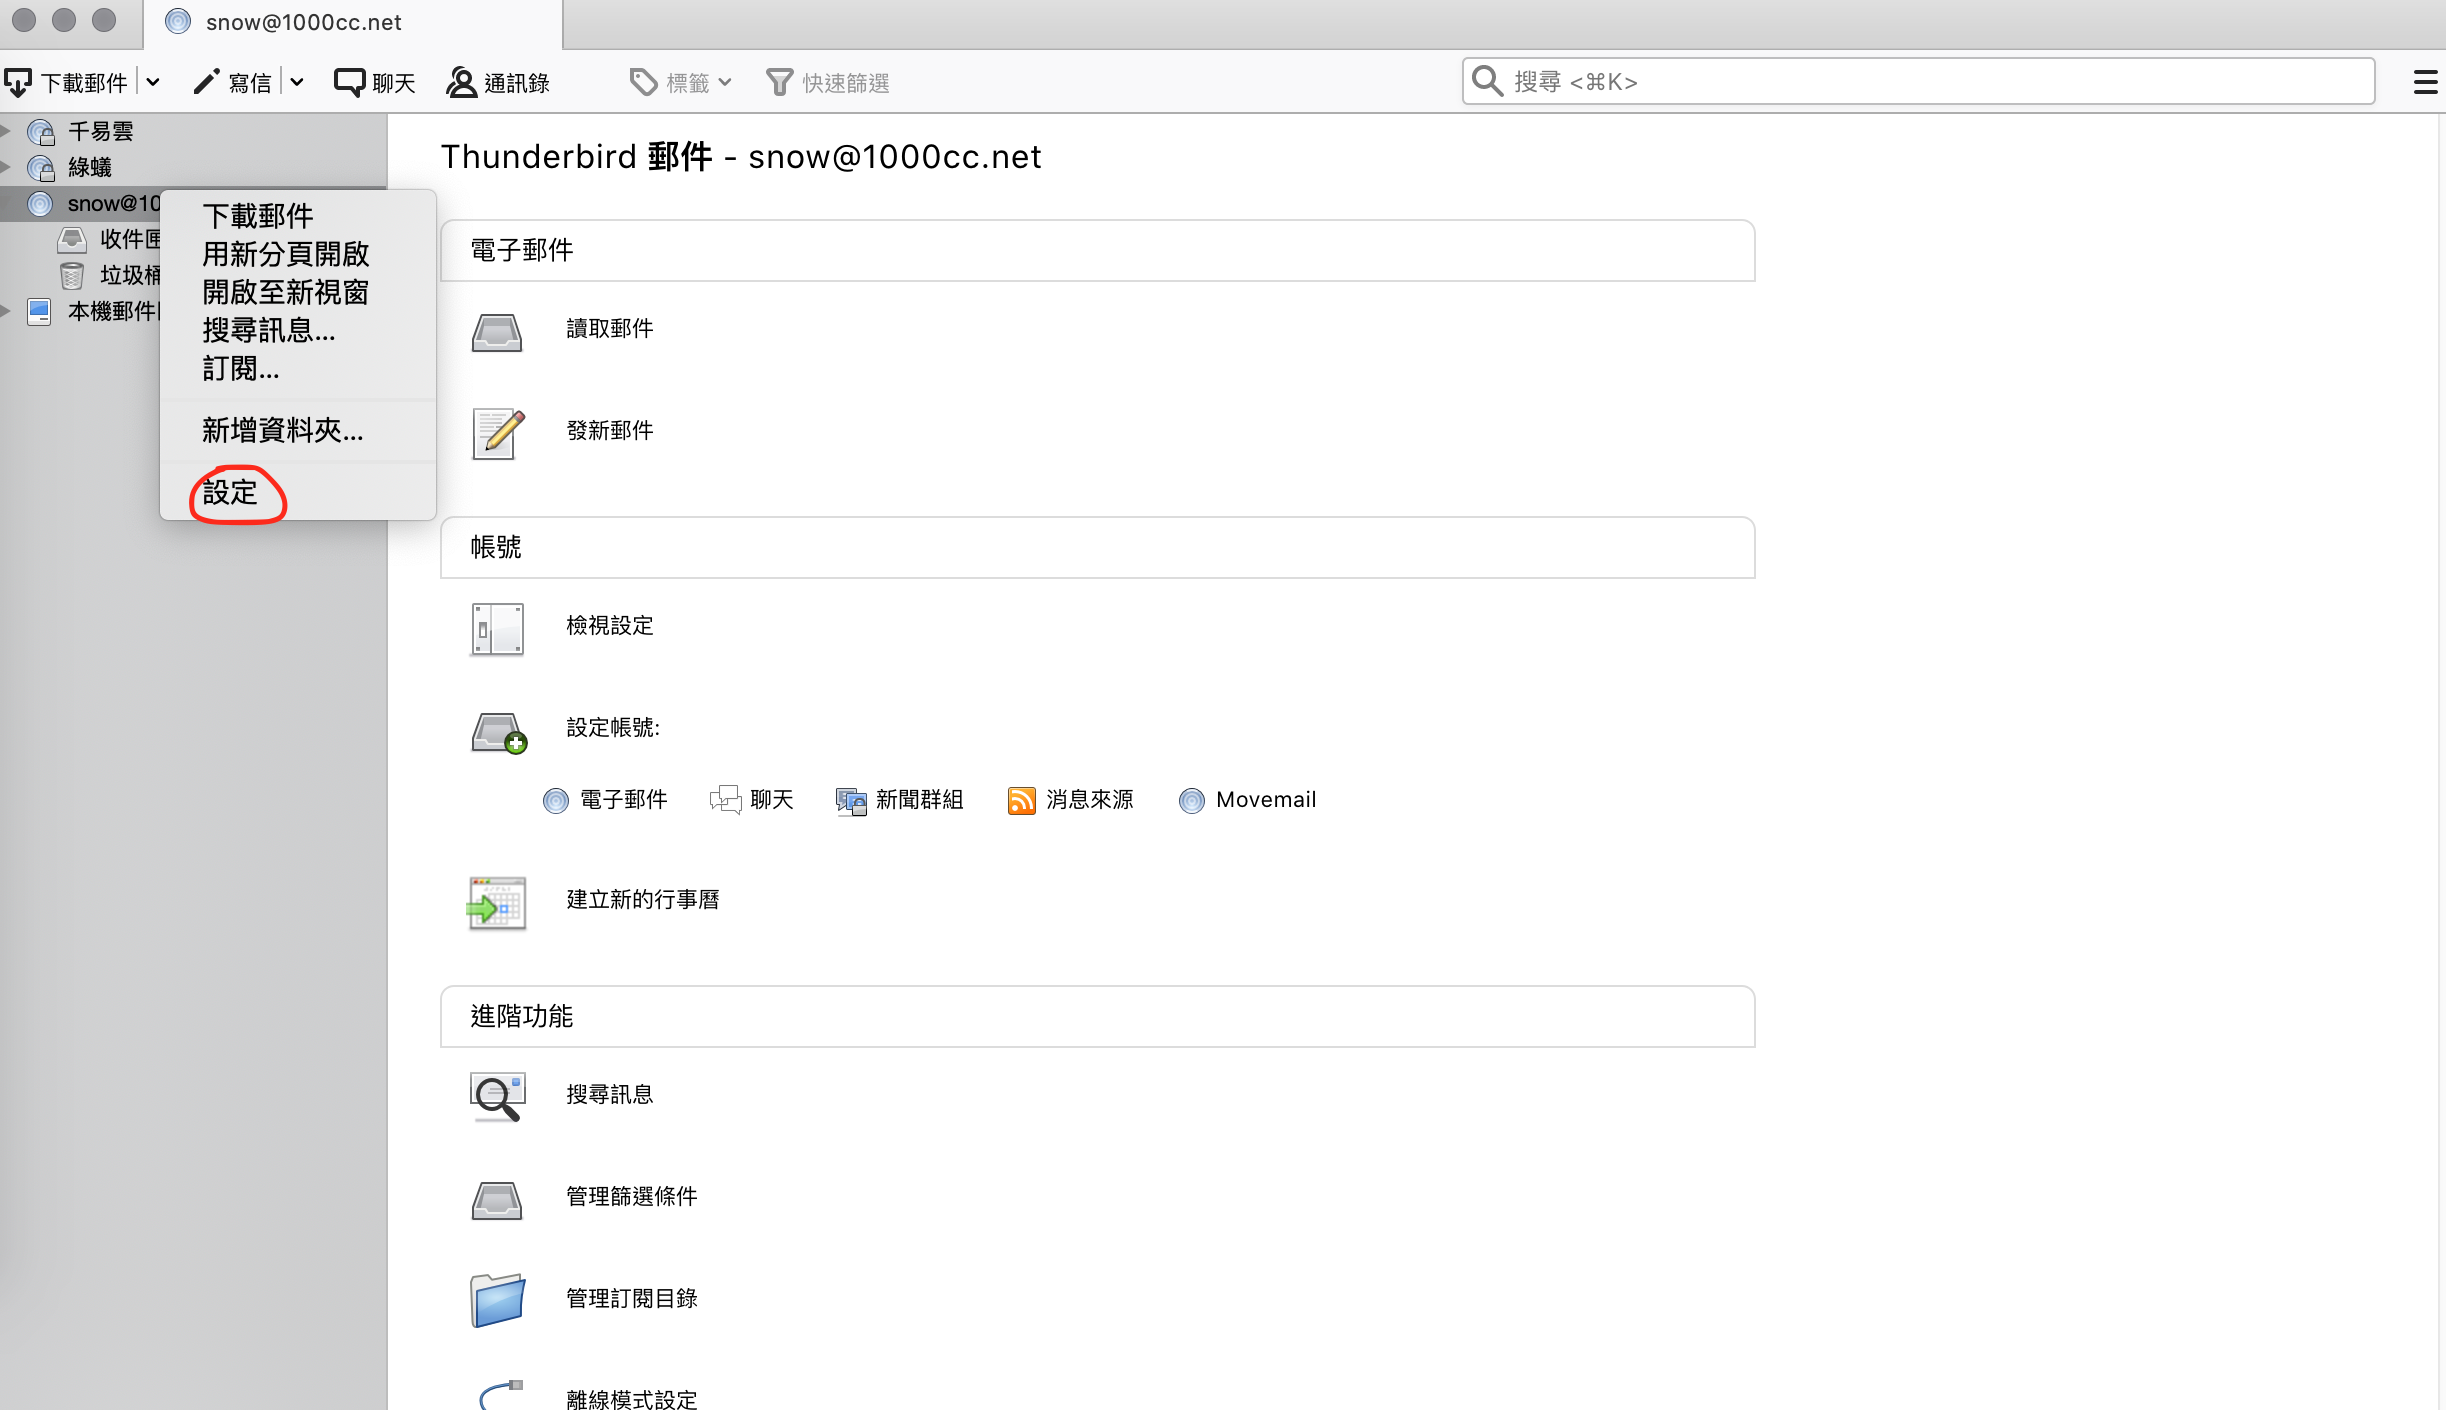
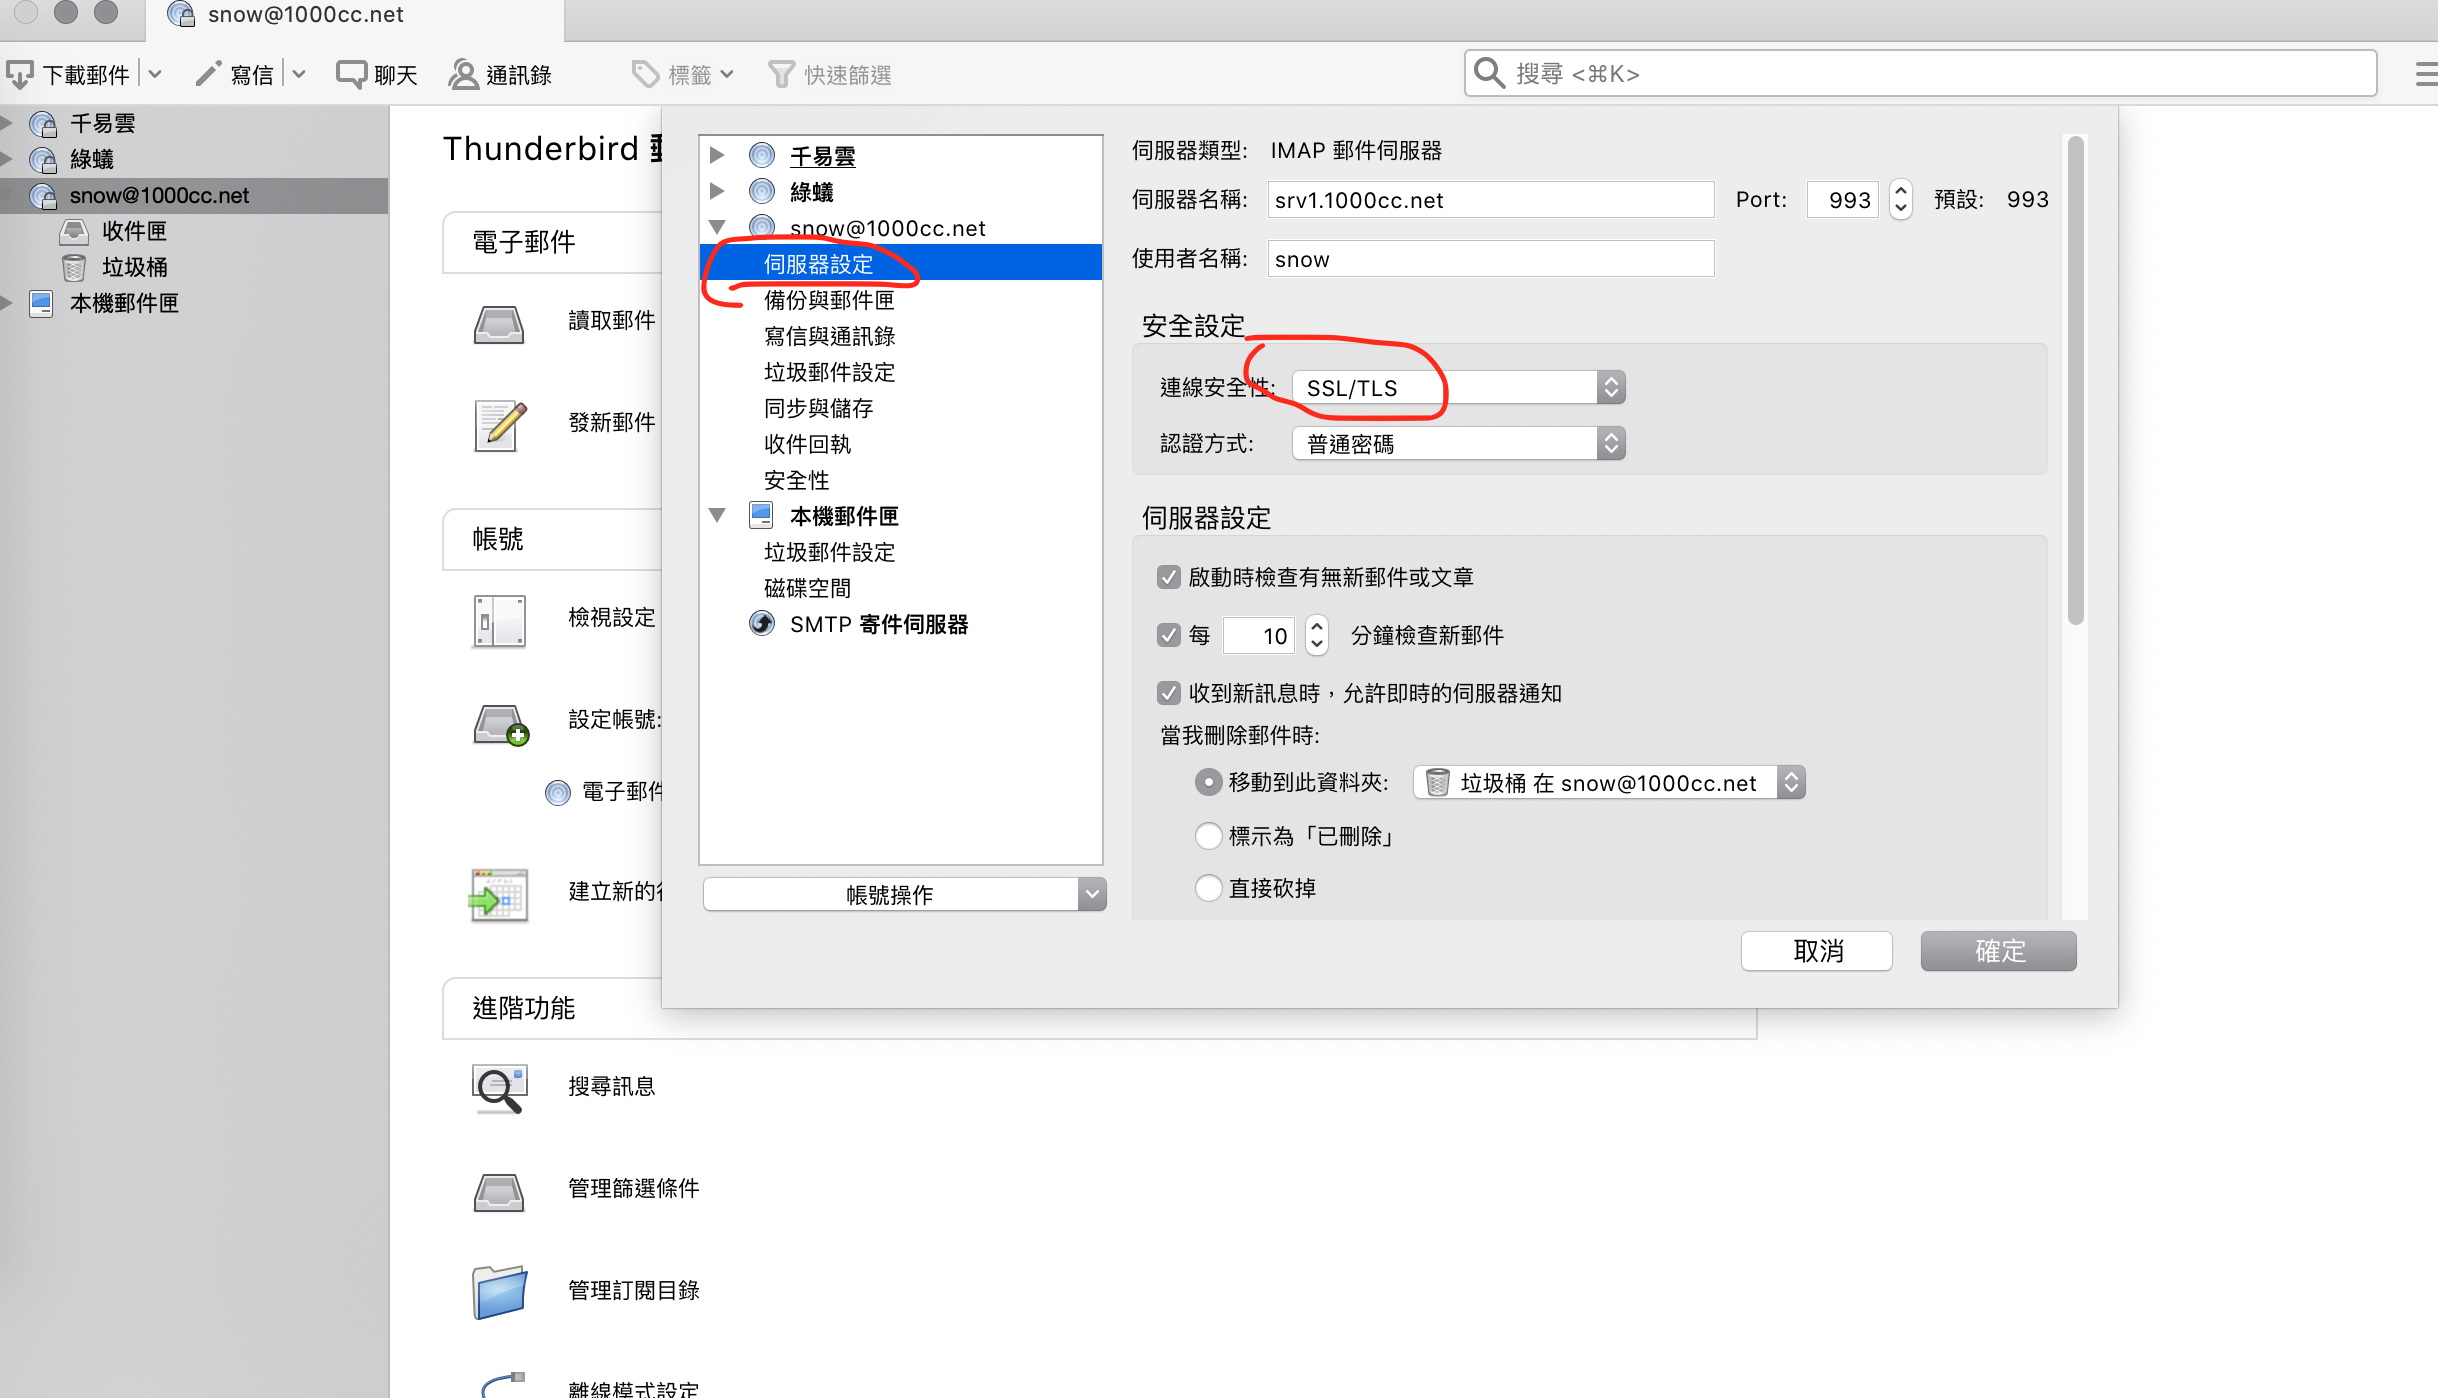
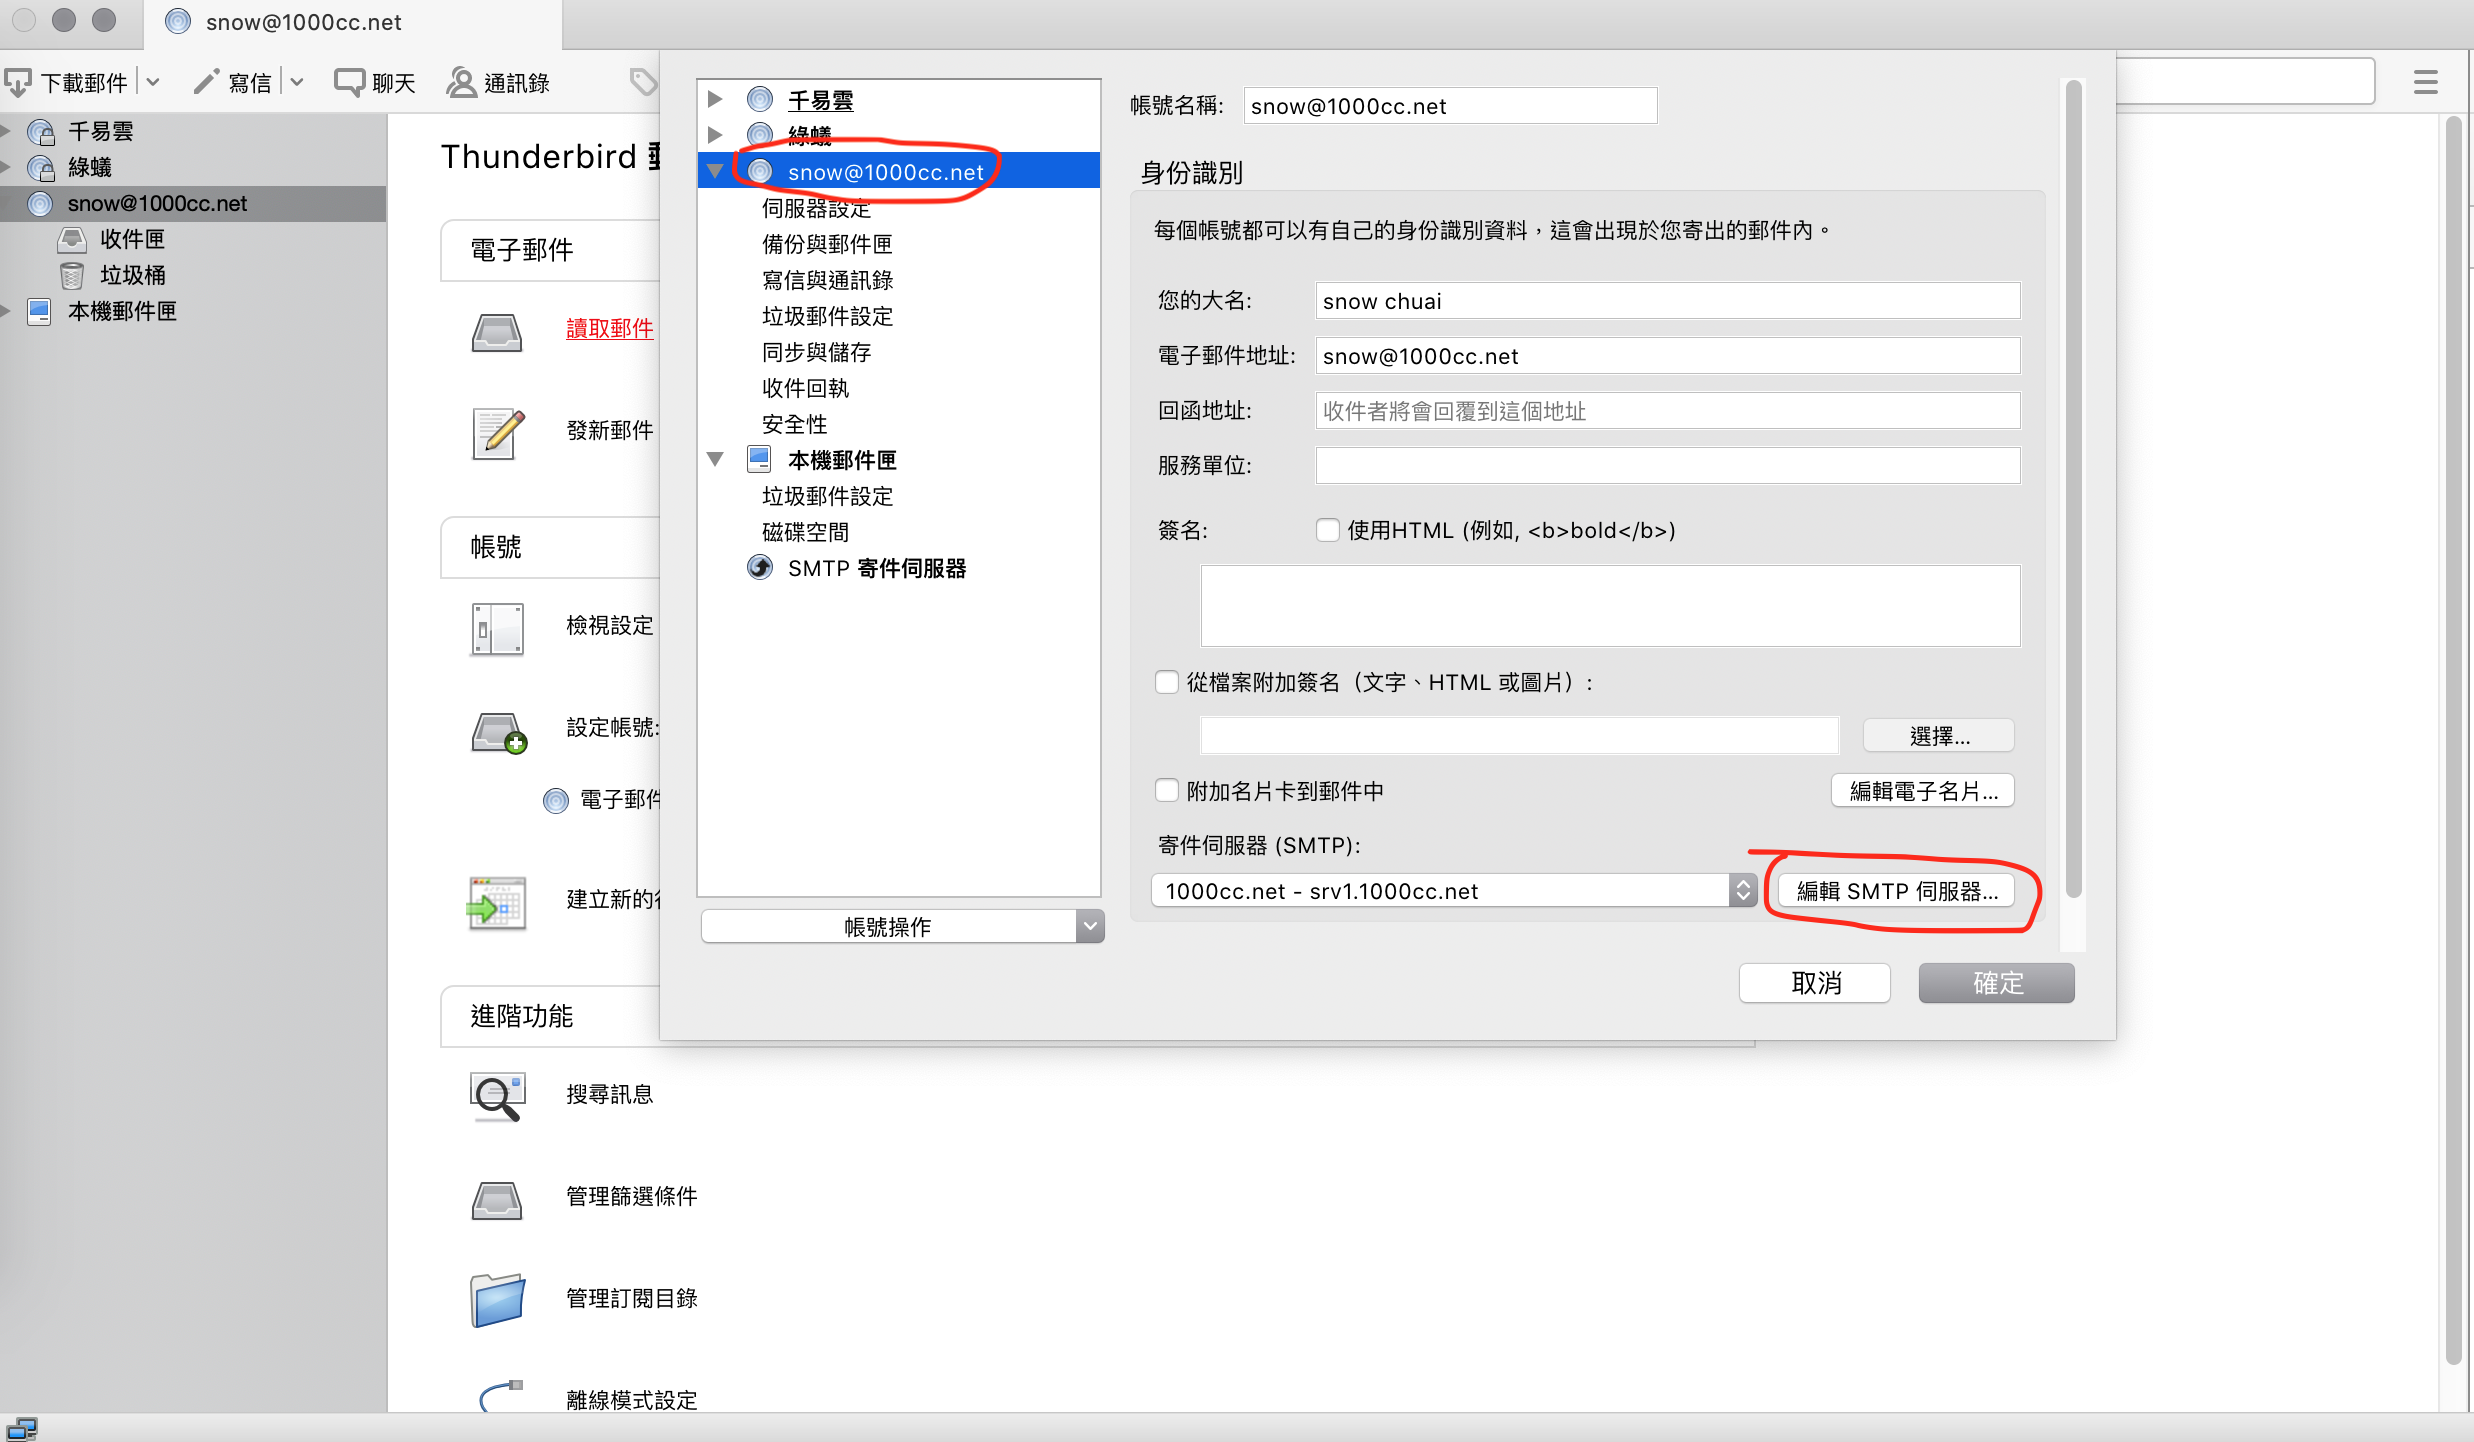
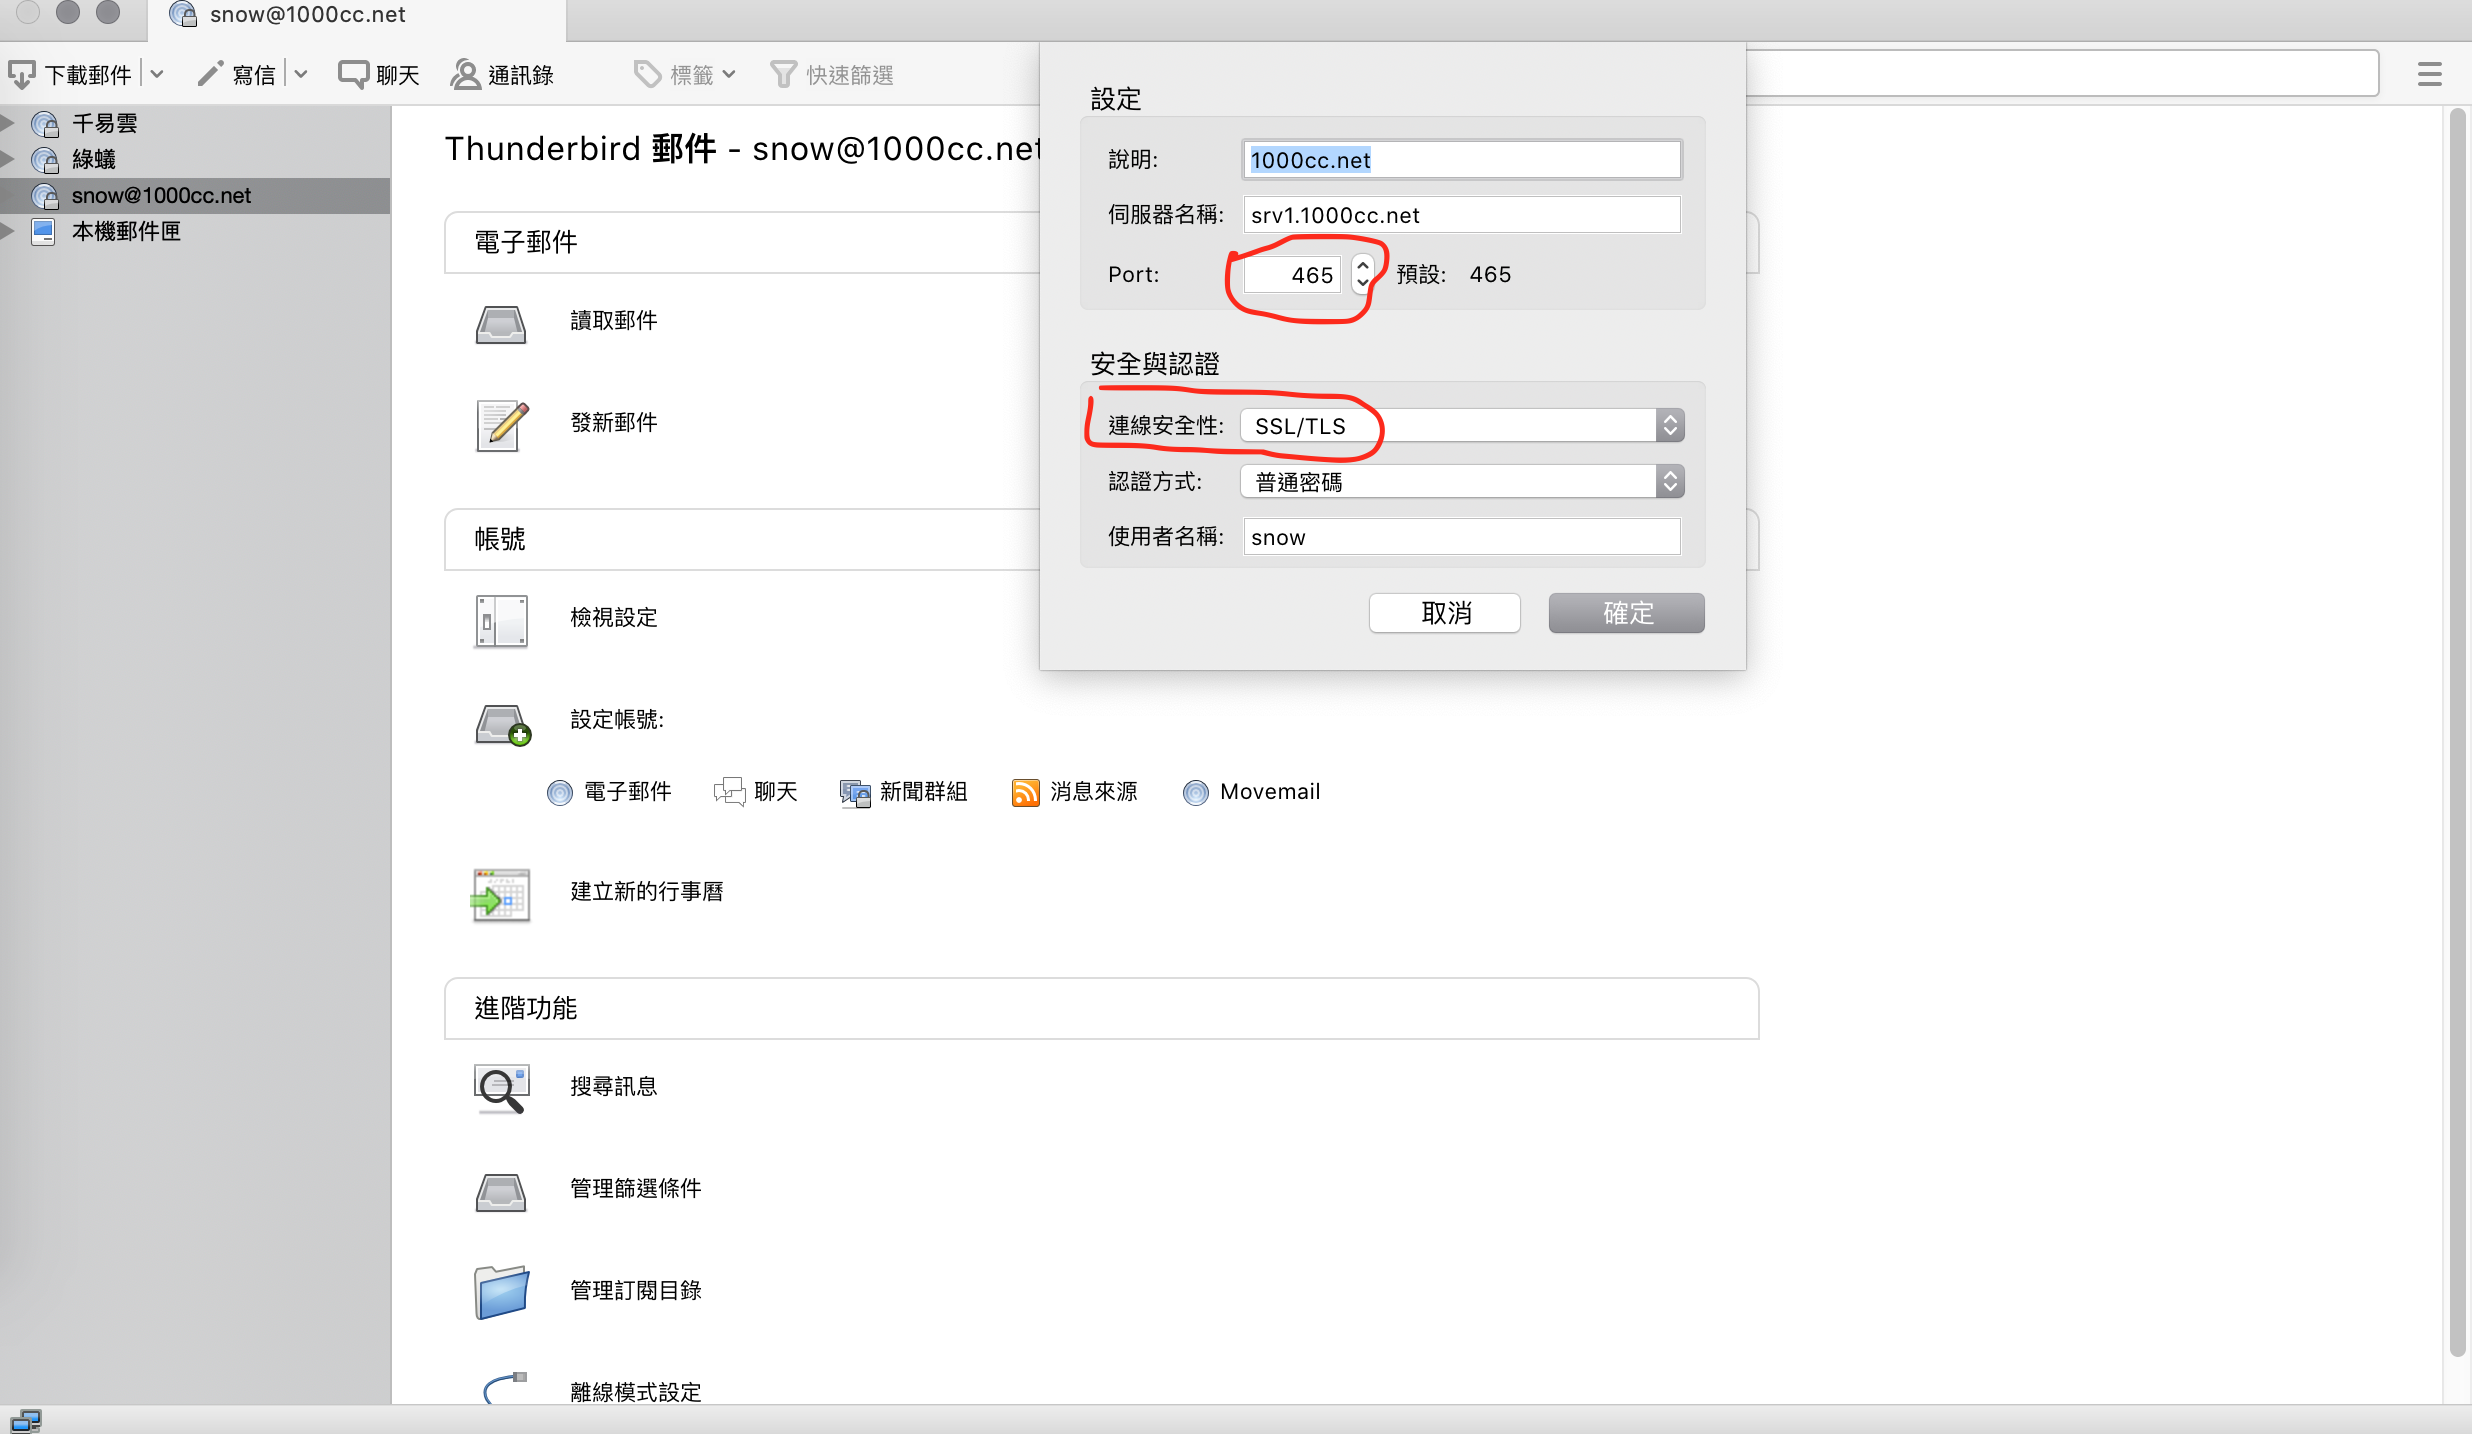
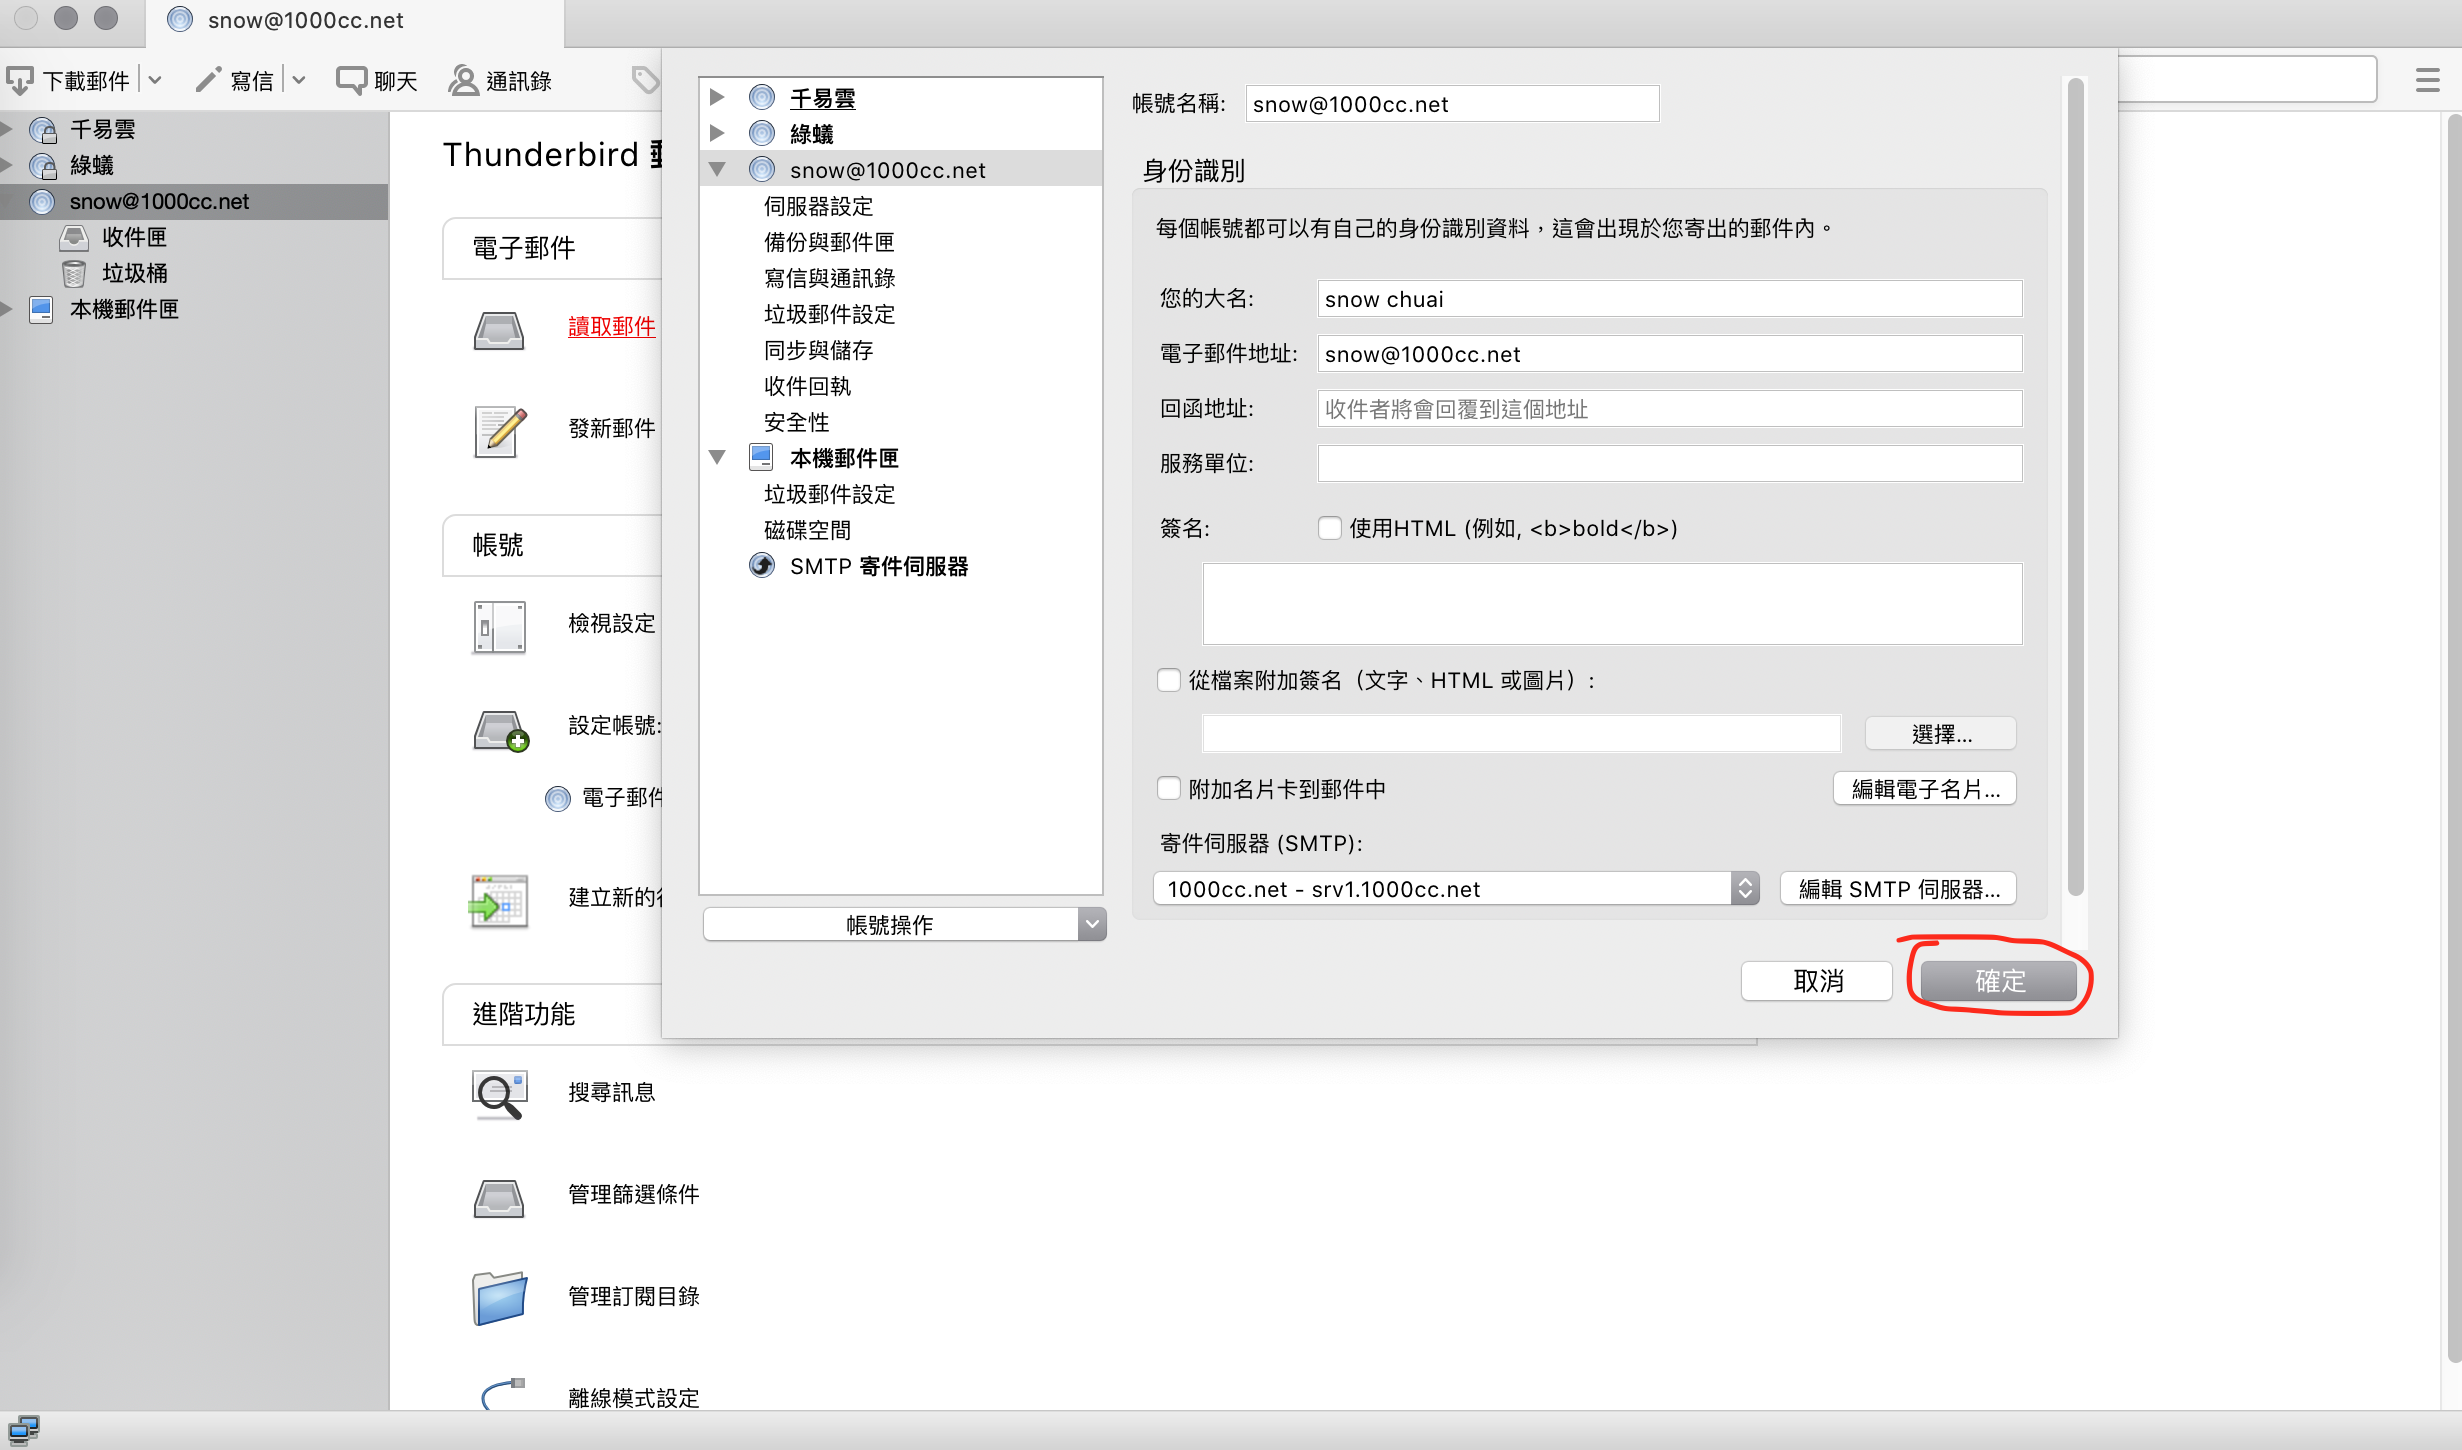
4. 使用GUI邮件客户端---Thunderbird
|
|

5. 增加SSL
1) 生成ssl证书 [root@srv1 ~]# cd /etc/pki/tls/certs/ [root@srv1 certs]# make server.key umask 77 ; \ /usr/bin/openssl genrsa -aes128 2048 > server.key Generating RSA private key, 2048 bit long modulus ..............................................+++ ..+++ e is 65537 (0x10001) Enter pass phrase: Verifying - Enter pass phrase: |
6. 设定虚拟域
1) 配置Postfix [root@srv1 ~]# vim /etc/postfix/main.cf # 与文件最后追加如下内容 # 设定虚拟域名为niliu.edu virtual_alias_domains = niliu.edu # 设定映射文件 virtual_alias_maps = hash:/etc/postfix/virtual |
7. 设定虚拟账户
1) 配置Postfix [root@srv1 ~]# useradd -u 22222 -s /sbin/nologin vmail |
8. 实现Clamav Amavisd
8.1 安装及使用Clamav
[root@srv1 ~]# sed -i -e "s/^Example/#Example/" /etc/freshclam.conf
2) 更新文件 [root@srv1 ~]# freshclam ClamAV update process started at Mon Feb 24 15:26:40 2020 DON'T PANIC! Read https://www.clamav.net/documents/upgrading-clamav main.cvd is up to date (version: 59, sigs: 4564902, f-level: 60, builder: sigmgr) daily.cvd is up to date (version: 25732, sigs: 2193988, f-level: 63, builder: raynman) Downloading bytecode.cvd [100%] bytecode.cvd updated (version: 331, sigs: 94, f-level: 63, builder: anvilleg) Database updated (6758984 signatures) from database.clamav.net (IP: 104.16.218.84)
3) 测试病毒扫描 [root@srv1 ~]# clamscan --infected --remove --recursive /home ----------- SCAN SUMMARY ----------- Known viruses: 6748717 Engine version: 0.101.5 Scanned directories: 39 Scanned files: 46 Infected files: 0 Data scanned: 0.00 MB Data read: 0.00 MB (ratio 0.00:1) Time: 94.521 sec (1 m 34 s)
4) 下载病毒测试扫描 [root@srv1 ~]# curl -O http://www.eicar.org/download/eicar.com
[root@srv1 ~]# clamscan --infected --remove --recursive . ./eicar.com: Win.Test.EICAR_HDB-1 FOUND ./eicar.com: Removed. # 找到病毒并删除
----------- SCAN SUMMARY ----------- Known viruses: 6748717 Engine version: 0.101.5 Scanned directories: 5 Scanned files: 12 Infected files: 1 Data scanned: 0.01 MB Data read: 0.00 MB (ratio 2.00:1) Time: 89.378 sec (1 m 29 s)8.2 安装配置Amavisd and Clamav Server.
2) 配置Amavisd [root@srv1 ~]# vim /etc/amavisd/amavisd.conf # 取消20行注释,并定义你的域名 $mydomain = '1000cc.net', 'niliu.edu';
# 取消152行注释,并定义你hostname $myhostname = 'srv1.1000cc.net';
# 取消154-155行注释 $notify_method = 'smtp:[127.0.0.1]:10025'; $forward_method = 'smtp:[127.0.0.1]:10025';
# 确保383行,为如下格式 ['ClamAV-clamd', \&ask_daemon, ["CONTSCAN {}\n", "/var/run/clamd.amavisd/clamd.sock"], qr/\bOK$/m, qr/\bFOUND$/m, qr/^.*?: (?!Infected Archive)(.*) FOUND$/m ],
[root@srv1 ~]# systemctl enable --now clamd@amavisd amavisd spamassassin
3) 配置Postfix [root@srv1 ~]# vim /etc/postfix/main.cf # 于文件最后追加如下内容 content_filter=smtp-amavis:[127.0.0.1]:10024
[root@srv1 ~]# vim /etc/postfix/master.cf ...... ...... ...... ...... ...... ......
# 于文件最后追加如下内容 smtp-amavis unix - - n - 2 smtp -o smtp_data_done_timeout=1200 -o smtp_send_xforward_command=yes -o disable_dns_lookups=yes 127.0.0.1:10025 inet n - n - - smtpd -o content_filter= -o local_recipient_maps= -o relay_recipient_maps= -o smtpd_restriction_classes= -o smtpd_client_restrictions= -o smtpd_helo_restrictions= -o smtpd_sender_restrictions= -o smtpd_recipient_restrictions=permit_mynetworks,reject -o mynetworks=127.0.0.0/8 -o strict_rfc821_envelopes=yes -o smtpd_error_sleep_time=0 -o smtpd_soft_error_limit=1001 -o smtpd_hard_error_limit=1000
[root@srv1 ~]# systemctl restart postfix
9. 邮件日志分析
9.1 使用pflogsumm
2) 生成昨天的报表 [root@srv1 ~]# perl /usr/sbin/pflogsumm -d yesterday /var/log/maillog Postfix log summaries for Feb 24
Grand Totals ------------ messages
4 received 13 delivered 0 forwarded 0 deferred 0 bounced 0 rejected (0%) 0 reject warnings 0 held 0 discarded (0%)
23709 bytes received 50136 bytes delivered 3 senders 2 sending hosts/domains 4 recipients 3 recipient hosts/domains
Per-Hour Traffic Summary ------------------------ time received delivered deferred bounced rejected -------------------------------------------------------------------- 0000-0100 0 0 0 0 0 0100-0200 1 1 0 0 0 0200-0300 0 6 0 0 0 0300-0400 0 0 0 0 0 0400-0500 0 0 0 0 0 0500-0600 0 0 0 0 0 0600-0700 0 0 0 0 0 0700-0800 0 0 0 0 0 0800-0900 0 0 0 0 0 0900-1000 0 0 0 0 0 1000-1100 0 0 0 0 0 1100-1200 0 0 0 0 0 1200-1300 0 0 0 0 0 1300-1400 0 0 0 0 0 1400-1500 0 0 0 0 0 1500-1600 0 0 0 0 0 1600-1700 3 6 0 0 0 1700-1800 0 0 0 0 0 1800-1900 0 0 0 0 0 1900-2000 0 0 0 0 0 2000-2100 0 0 0 0 0 2100-2200 0 0 0 0 0 2200-2300 0 0 0 0 0 2300-2400 0 0 0 0 0
Host/Domain Summary: Message Delivery -------------------------------------- sent cnt bytes defers avg dly max dly host/domain -------- ------- ------- ------- ------- ----------- 7 25723 0 1.1 s 4.9 s 1000cc.net 5 23945 0 0.5 s 2.0 s niliu.edu 1 468 0 0.1 s 0.1 s localhost.1000cc.net
Host/Domain Summary: Messages Received --------------------------------------- msg cnt bytes host/domain -------- ------- ----------- 2 12421 niliu.edu 2 11288 1000cc.net
Senders by message count ------------------------ 2 lisa@niliu.edu 1 gzliu@1000cc.net 1 snow@1000cc.net
Recipients by message count --------------------------- 6 gzliu@1000cc.net 5 lisa@niliu.edu 1 snow@localhost.1000cc.net 1 snow@1000cc.net
Senders by message size ----------------------- 12421 lisa@niliu.edu 10820 gzliu@1000cc.net 468 snow@1000cc.net
Recipients by message size -------------------------- 25058 gzliu@1000cc.net 23945 lisa@niliu.edu 665 snow@1000cc.net 468 snow@localhost.1000cc.net
message deferral detail: none
message bounce detail (by relay): none
message reject detail: none
message reject warning detail: none
message hold detail: none
message discard detail: none
smtp delivery failures: none
Warnings -------- smtps/smtpd (total: 3) 2 TLS library problem: 30548:error:14094418:SSL routines:ssl3_rea... 1 unknown[192.168.10.125]: SASL CRAM-MD5 authentication failed: P...
Fatal Errors: none
Panics: none
Master daemon messages ---------------------- 8 daemon started -- version 2.10.1, configuration /etc/postfix 6 terminating on signal 15
[root@srv1 ~]# crontab -e 00 01 * * * perl /usr/sbin/pflogsumm -e -d yesterday /var/log/maillog | mail -s 'Logwatch for Postfix' root9.2 使用AWstats
2) 安装AWstats [root@srv1 ~]# yum --enablerepo=epel install awstats -y
3) 配置AWstats [root@srv1 ~]# vim /etc/awstats/awstats.srv1.1000cc.net.conf 更改50行 LogFile="/usr/share/awstats/tools/maillogconvert.pl standard < /var/log/maillog |"
更改62行,为Mail Log LogType=M
注释125行,于126行添加如下内容 #LogFormat=1 LogFormat="%time2 %email %email_r %host %host_r %method %url %code %bytesd"
修改866-881行的值 LevelForBrowsersDetection=0 LevelForOSDetection=0 LevelForRefererAnalyze=0 LevelForRobotsDetection=0 LevelForSearchEnginesDetection=0 LevelForKeywordsDetection=0 LevelForFileTypesDetection=0 LevelForWormsDetection=0
从984行修改如下值 ShowMonthStats=UHB ShowDaysOfMonthStats=HB ShowDaysOfWeekStats=HB ShowHoursStats=HB ShowDomainsStats=0 ShowHostsStats=HBL ShowRobotsStats=0 ShowEMailSenders=HBML ShowEMailReceivers=HBML ShowSessionsStats=0 ShowPagesStats=0 ShowFileTypesStats=0 ShowOSStats=0 ShowBrowsersStats=0 ShowOriginStats=0 ShowKeyphrasesStats=0 ShowKeywordsStats=0 ShowMiscStats=0 ShowHTTPErrorsStats=0 ShowSMTPErrorsStats=1
[root@srv1 ~]# vim /etc/httpd/conf.d/awstats.conf 于30行添加如下内容 ...... ...... Require local Require ip 192.168.10.0/24 ...... ......
[root@srv1 ~]# systemctl restart httpd
4) 更新reports # 如果打算自动更新可采用计划任务(以每小时更新一次) [root@srv1 ~]# /usr/share/awstats/wwwroot/cgi-bin/awstats.pl -update -config=srv1.1000cc.net -configdir=/etc/awstats Create/Update database for config "/etc/awstats/awstats.srv1.1000cc.net.conf" by AWStats version 7.7 (build 20180105) From data in log file "/usr/share/awstats/tools/maillogconvert.pl standard < /var/log/maillog |"... Phase 1 : First bypass old records, searching new record... Searching new records from beginning of log file... Phase 2 : Now process new records (Flush history on disk after 20000 hosts)... Jumped lines in file: 0 Parsed lines in file: 13 Found 3 dropped records, Found 0 comments, Found 0 blank records, Found 0 corrupted records, Found 0 old records, Found 10 new qualified records.
5) 访问测试 [浏览器]===>http://srv1.1000cc.net/awstats/awstats.pl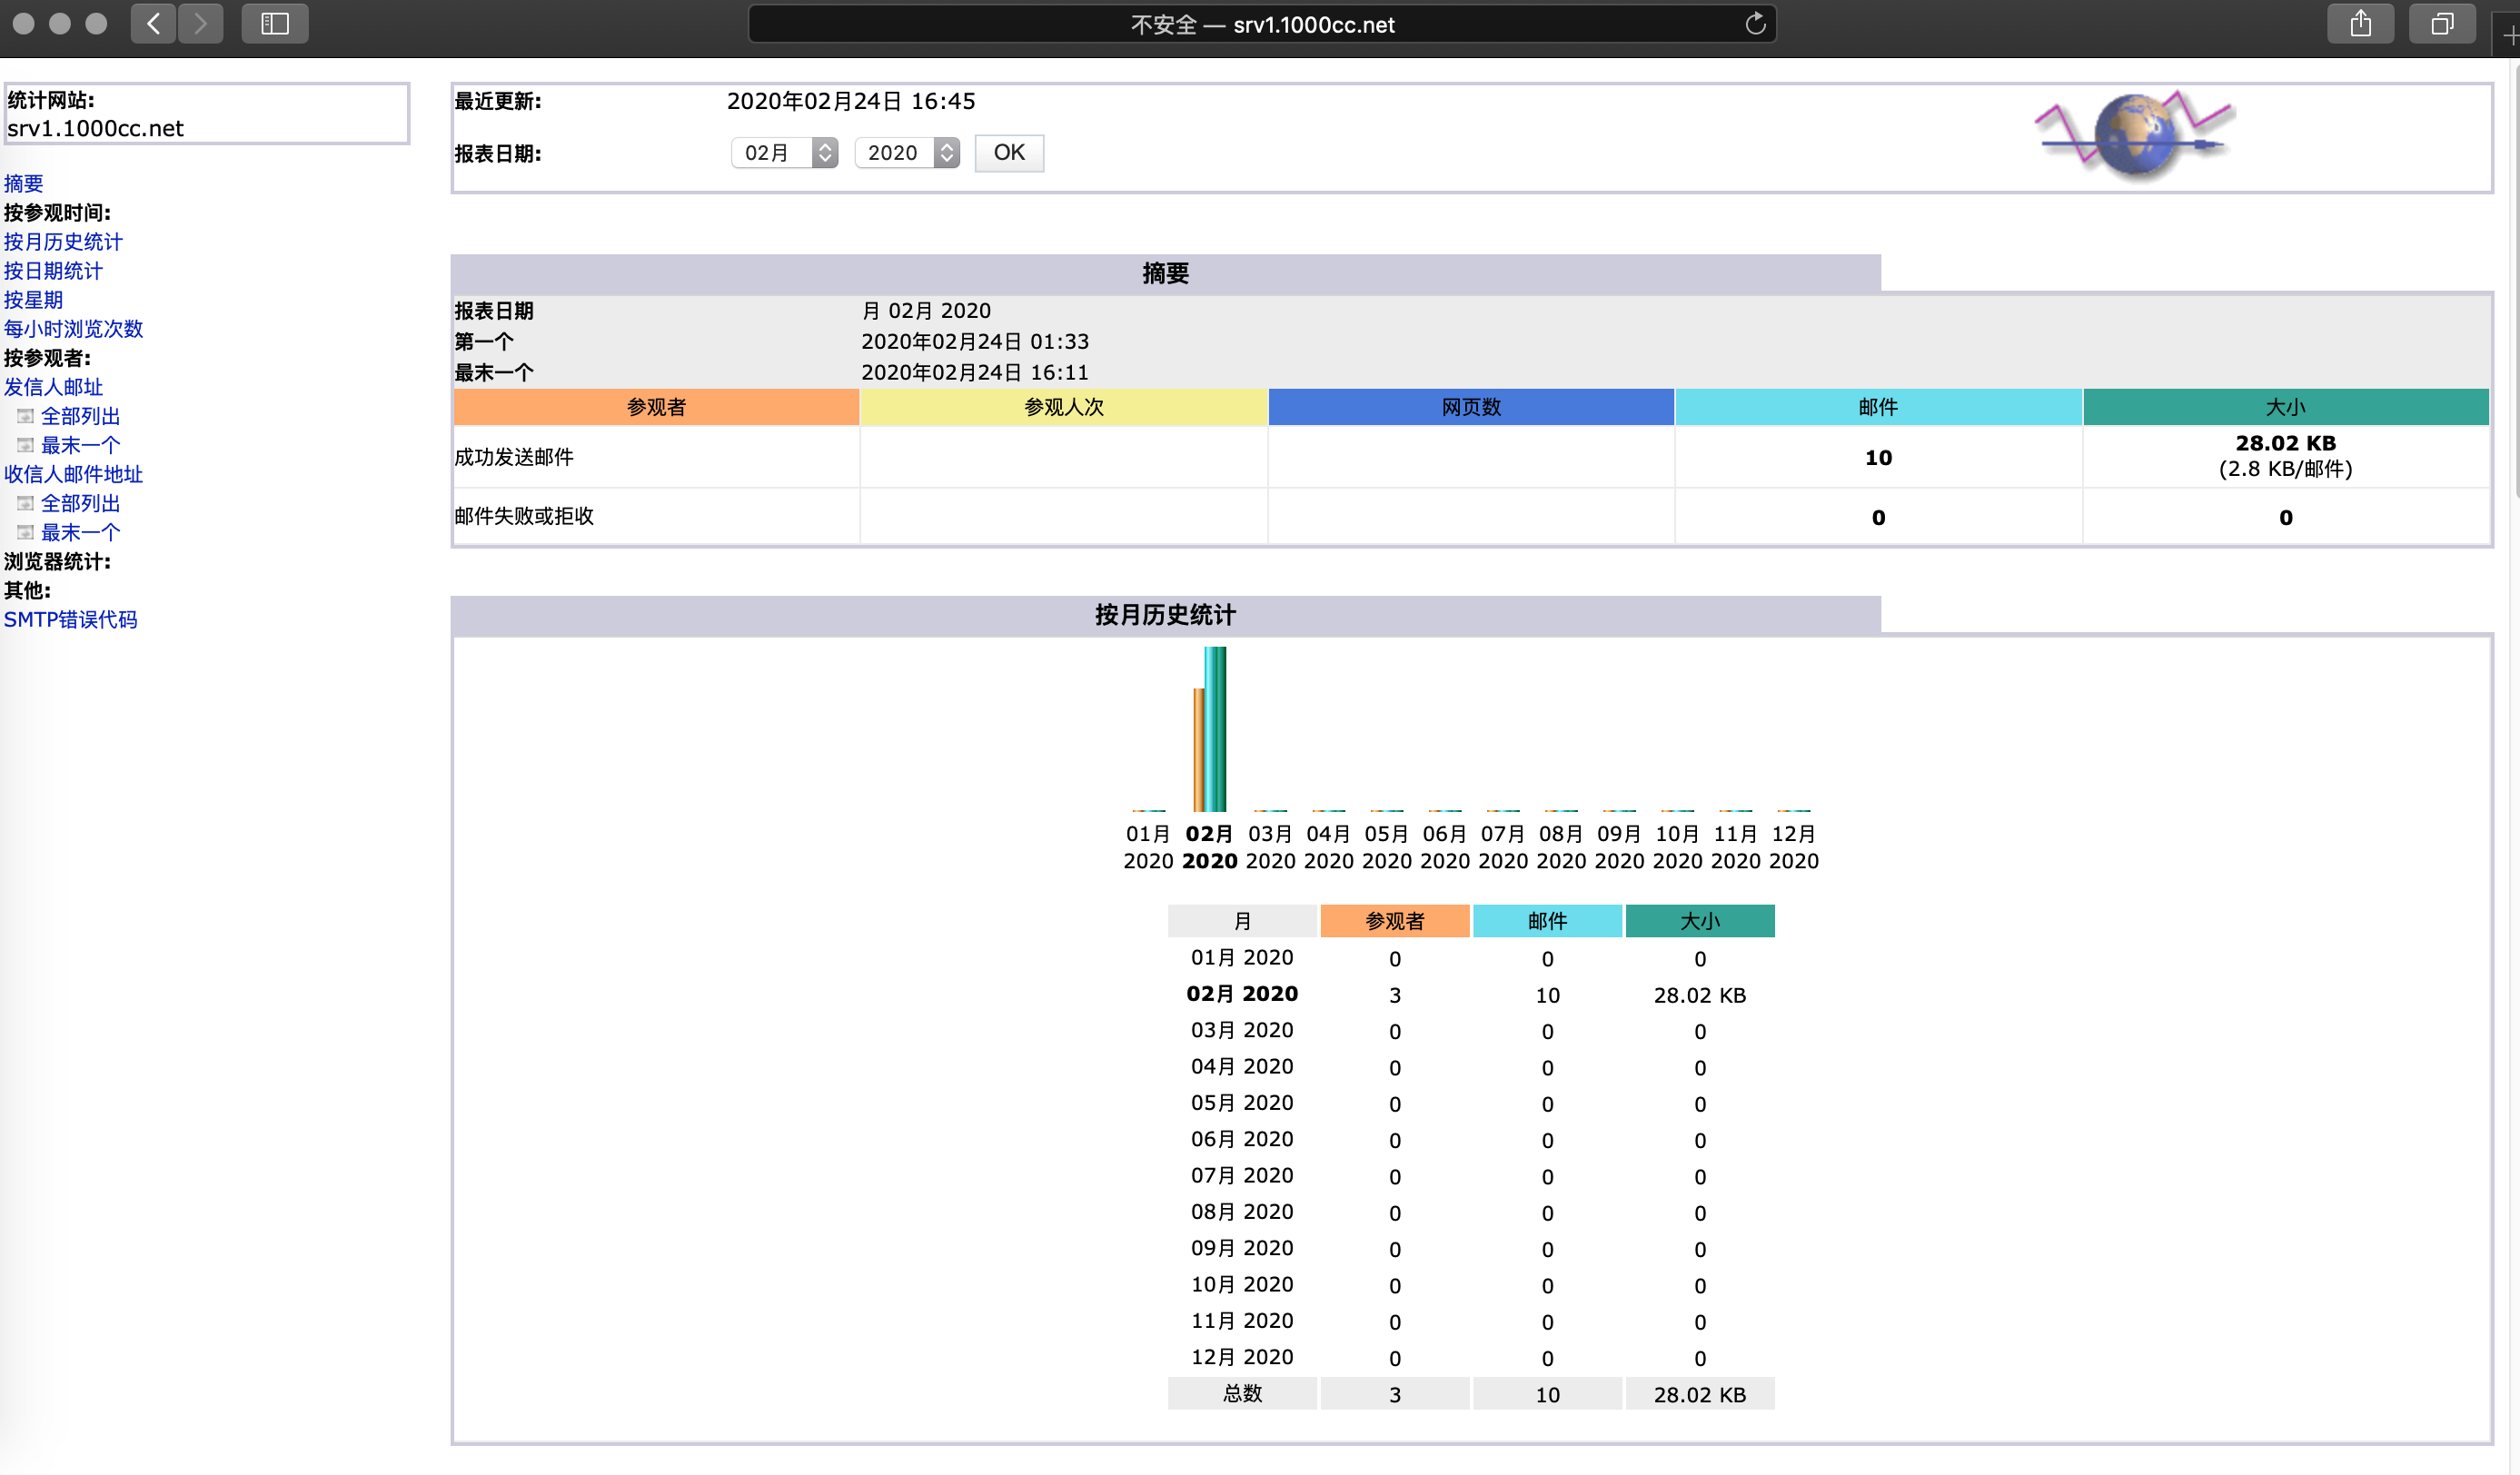
10. 安装及配置Mailman
10.1 安装及配置Mailman
2) 配置Mailman [root@srv1 ~]# vim /etc/mailman/mm_cfg.py # 更改86行,定义Mail server的FQDN DEFAULT_URL_HOST = 'srv1.1000cc.net' DEFAULT_EMAIL_HOST = 'srv1.1000cc.net'
[root@srv1 ~]# vim /usr/lib/mailman/Mailman/Defaults.py # 更改415行,定义MTA软件 MTA = 'Postfix'
# 更改875行,定义语言 DEFAULT_SERVER_LANGUAGE = 'zh_CN'
# 更改893行 OWNERS_CAN_DELETE_THEIR_OWN_LISTS = Yes
# 更改1035行 # line 1035: change if you need # set action when peopel who are not list member send to mailing list # 0 = Accept # 1 = Hold # 2 = Reject # 3 = Discard DEFAULT_GENERIC_NONMEMBER_ACTION = 1
# 更改1106行 # 0 - Reply-To: not munged # 1 - Reply-To: set back to the list # 2 - Reply-To: set to an explicit value (reply_to_address) DEFAULT_REPLY_GOES_TO_LIST = 0
# 生成别名文件 [root@srv1 ~]# /usr/lib/mailman/bin/genaliases
# 设置Mailman管理员密码 [root@srv1 ~]# /usr/lib/mailman/bin/mmsitepass New site password: Again to confirm password: Password changed.
# 检测权限 [root@srv1 ~]# /usr/lib/mailman/bin/check_perms /usr/lib/mailman/Mailman/mm_cfg.pyc bad group (has: root, expected mailman) /usr/lib/mailman/Mailman/Defaults.pyc bad group (has: root, expected mailman) /usr/lib/mailman/bin/mailman-update-cfg bad group (has: root, expected mailman) /etc/mailman/aliases.db owned by root (must be owned by mailman /etc/mailman/aliases.db permissions must be 066x (got 0100640) Problems found: 5 Re-run as mailman (or root) with -f flag to fix.
# 改进权限 [root@srv1 ~]# /usr/lib/mailman/bin/check_perms -f /usr/lib/mailman/Mailman/mm_cfg.pyc bad group (has: root, expected mailman) (fixing) /usr/lib/mailman/Mailman/Defaults.pyc bad group (has: root, expected mailman) (fixing) /usr/lib/mailman/bin/mailman-update-cfg bad group (has: root, expected mailman) (fixing) /etc/mailman/aliases.db owned by root (must be owned by mailman (fixing) /etc/mailman/aliases.db permissions must be 066x (got 0100640) (fixing) Problems found: 5 Re-run as mailman (or root) with -f flag to fix
# 再次检测权限 [root@srv1 ~]# /usr/lib/mailman/bin/check_perms No problems found
# 修改权限及属主 [root@srv1 ~]# chown apache /etc/mailman/aliases [root@srv1 ~]# chmod 664 /etc/mailman/aliases*
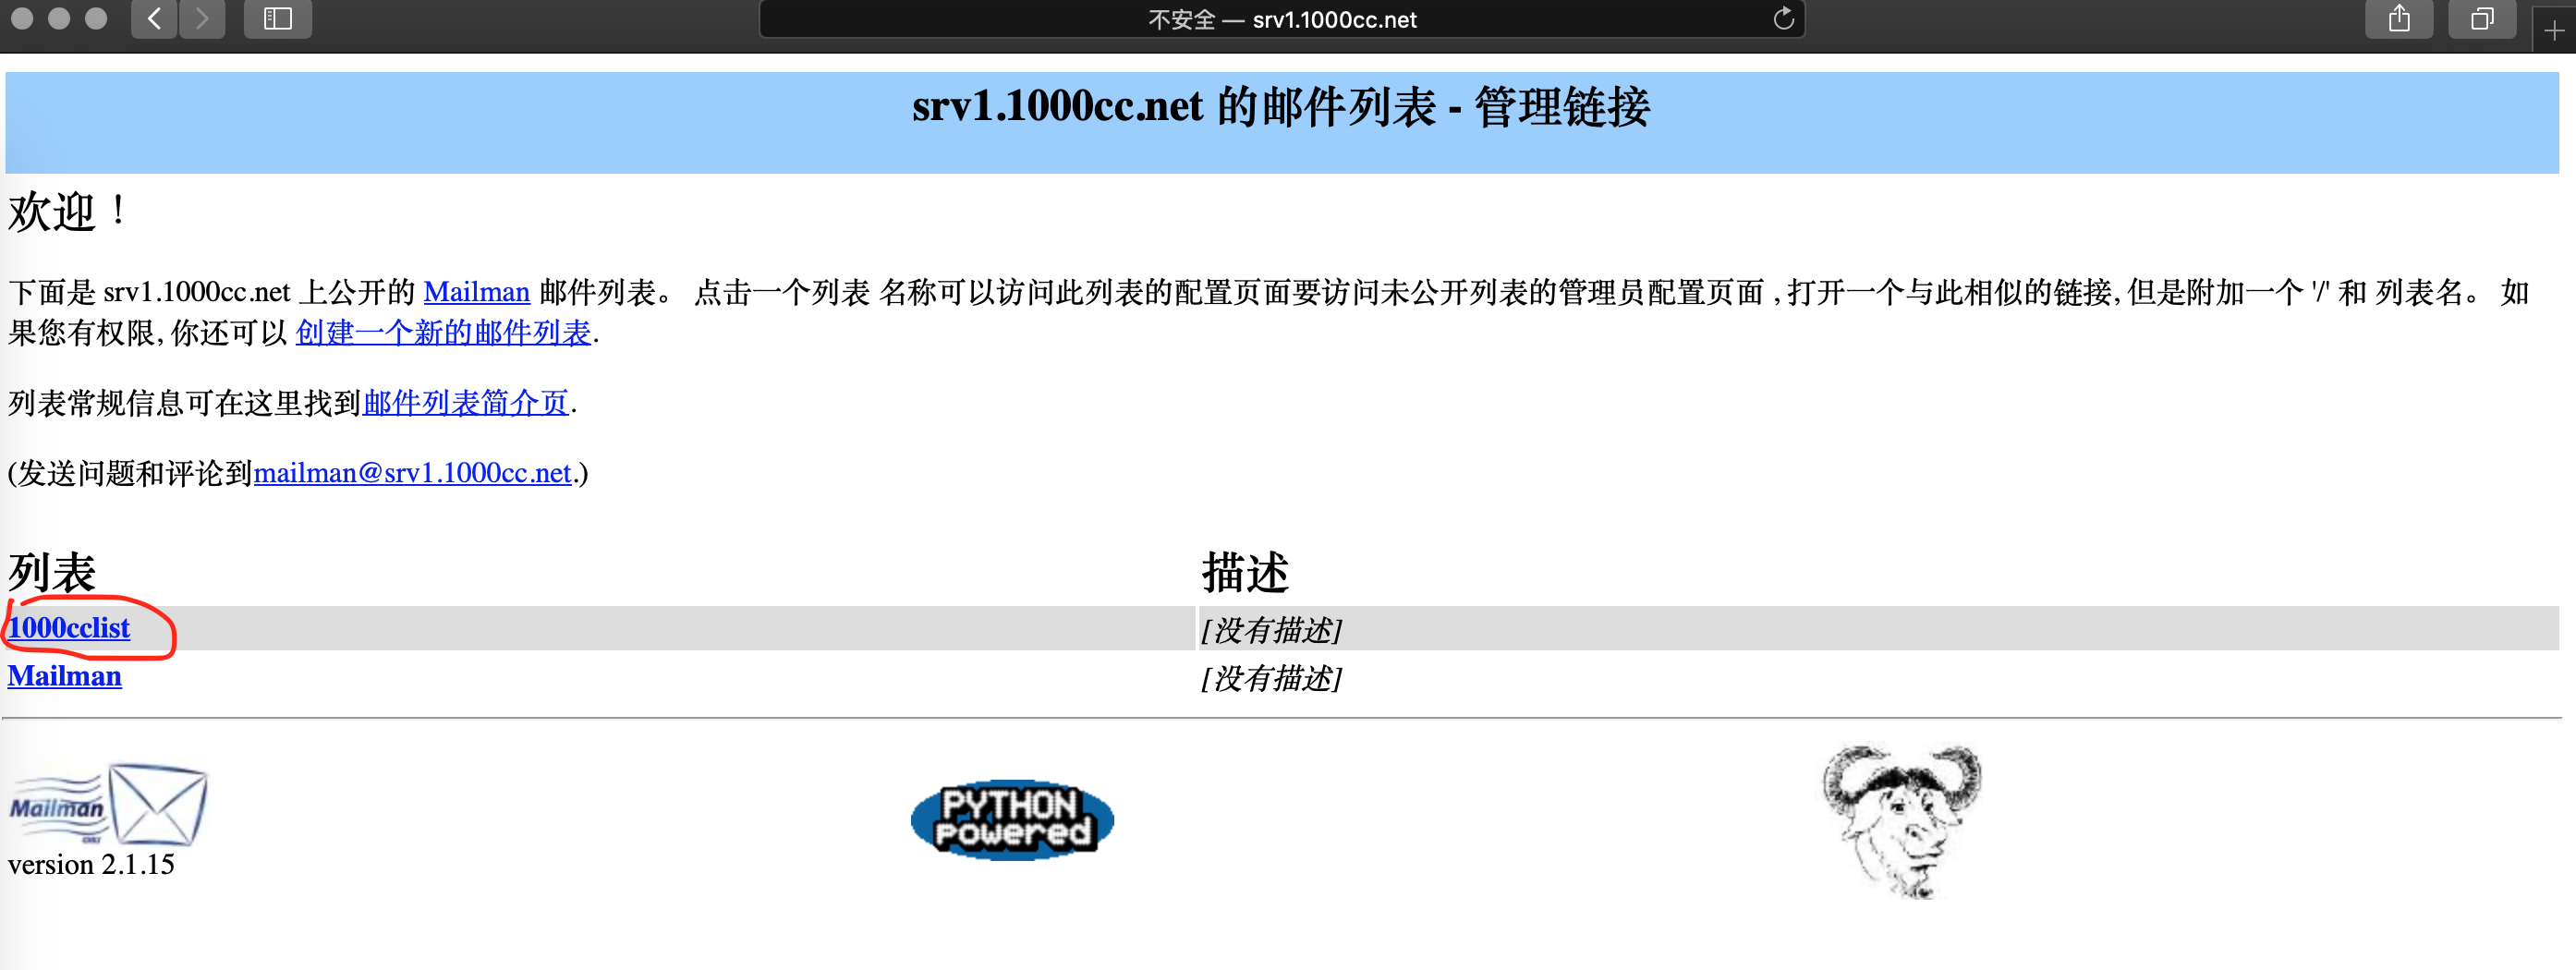
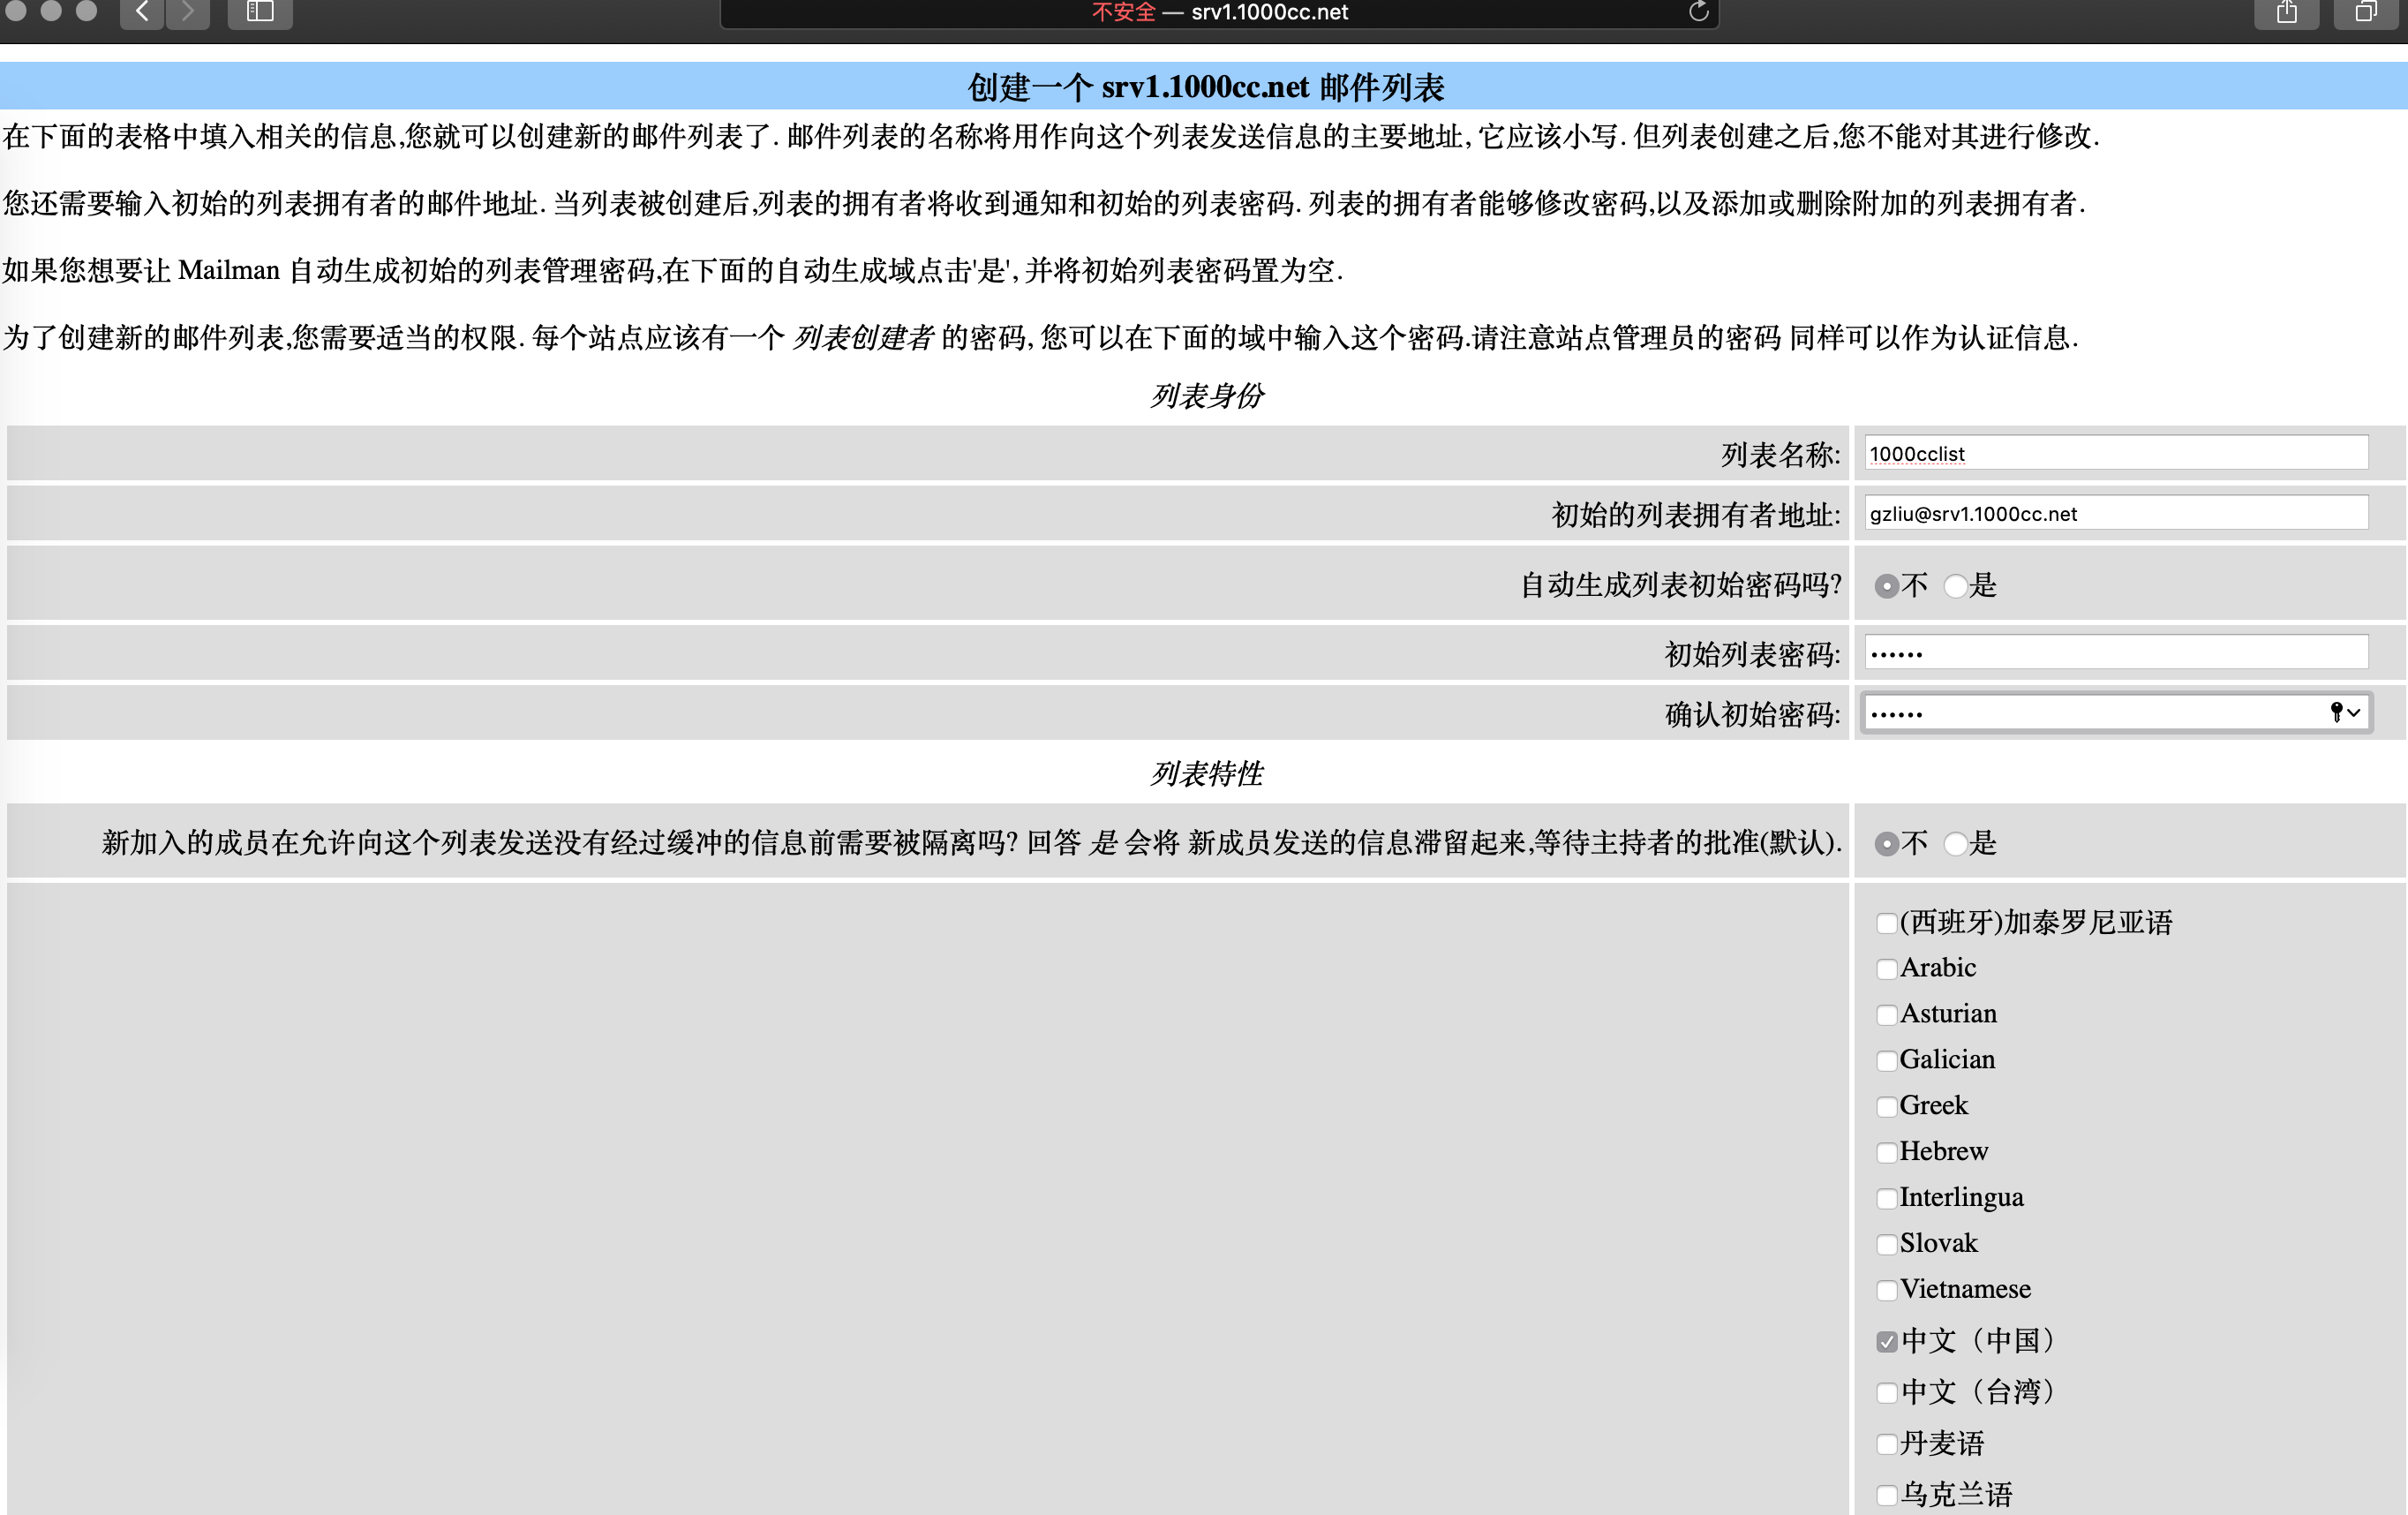
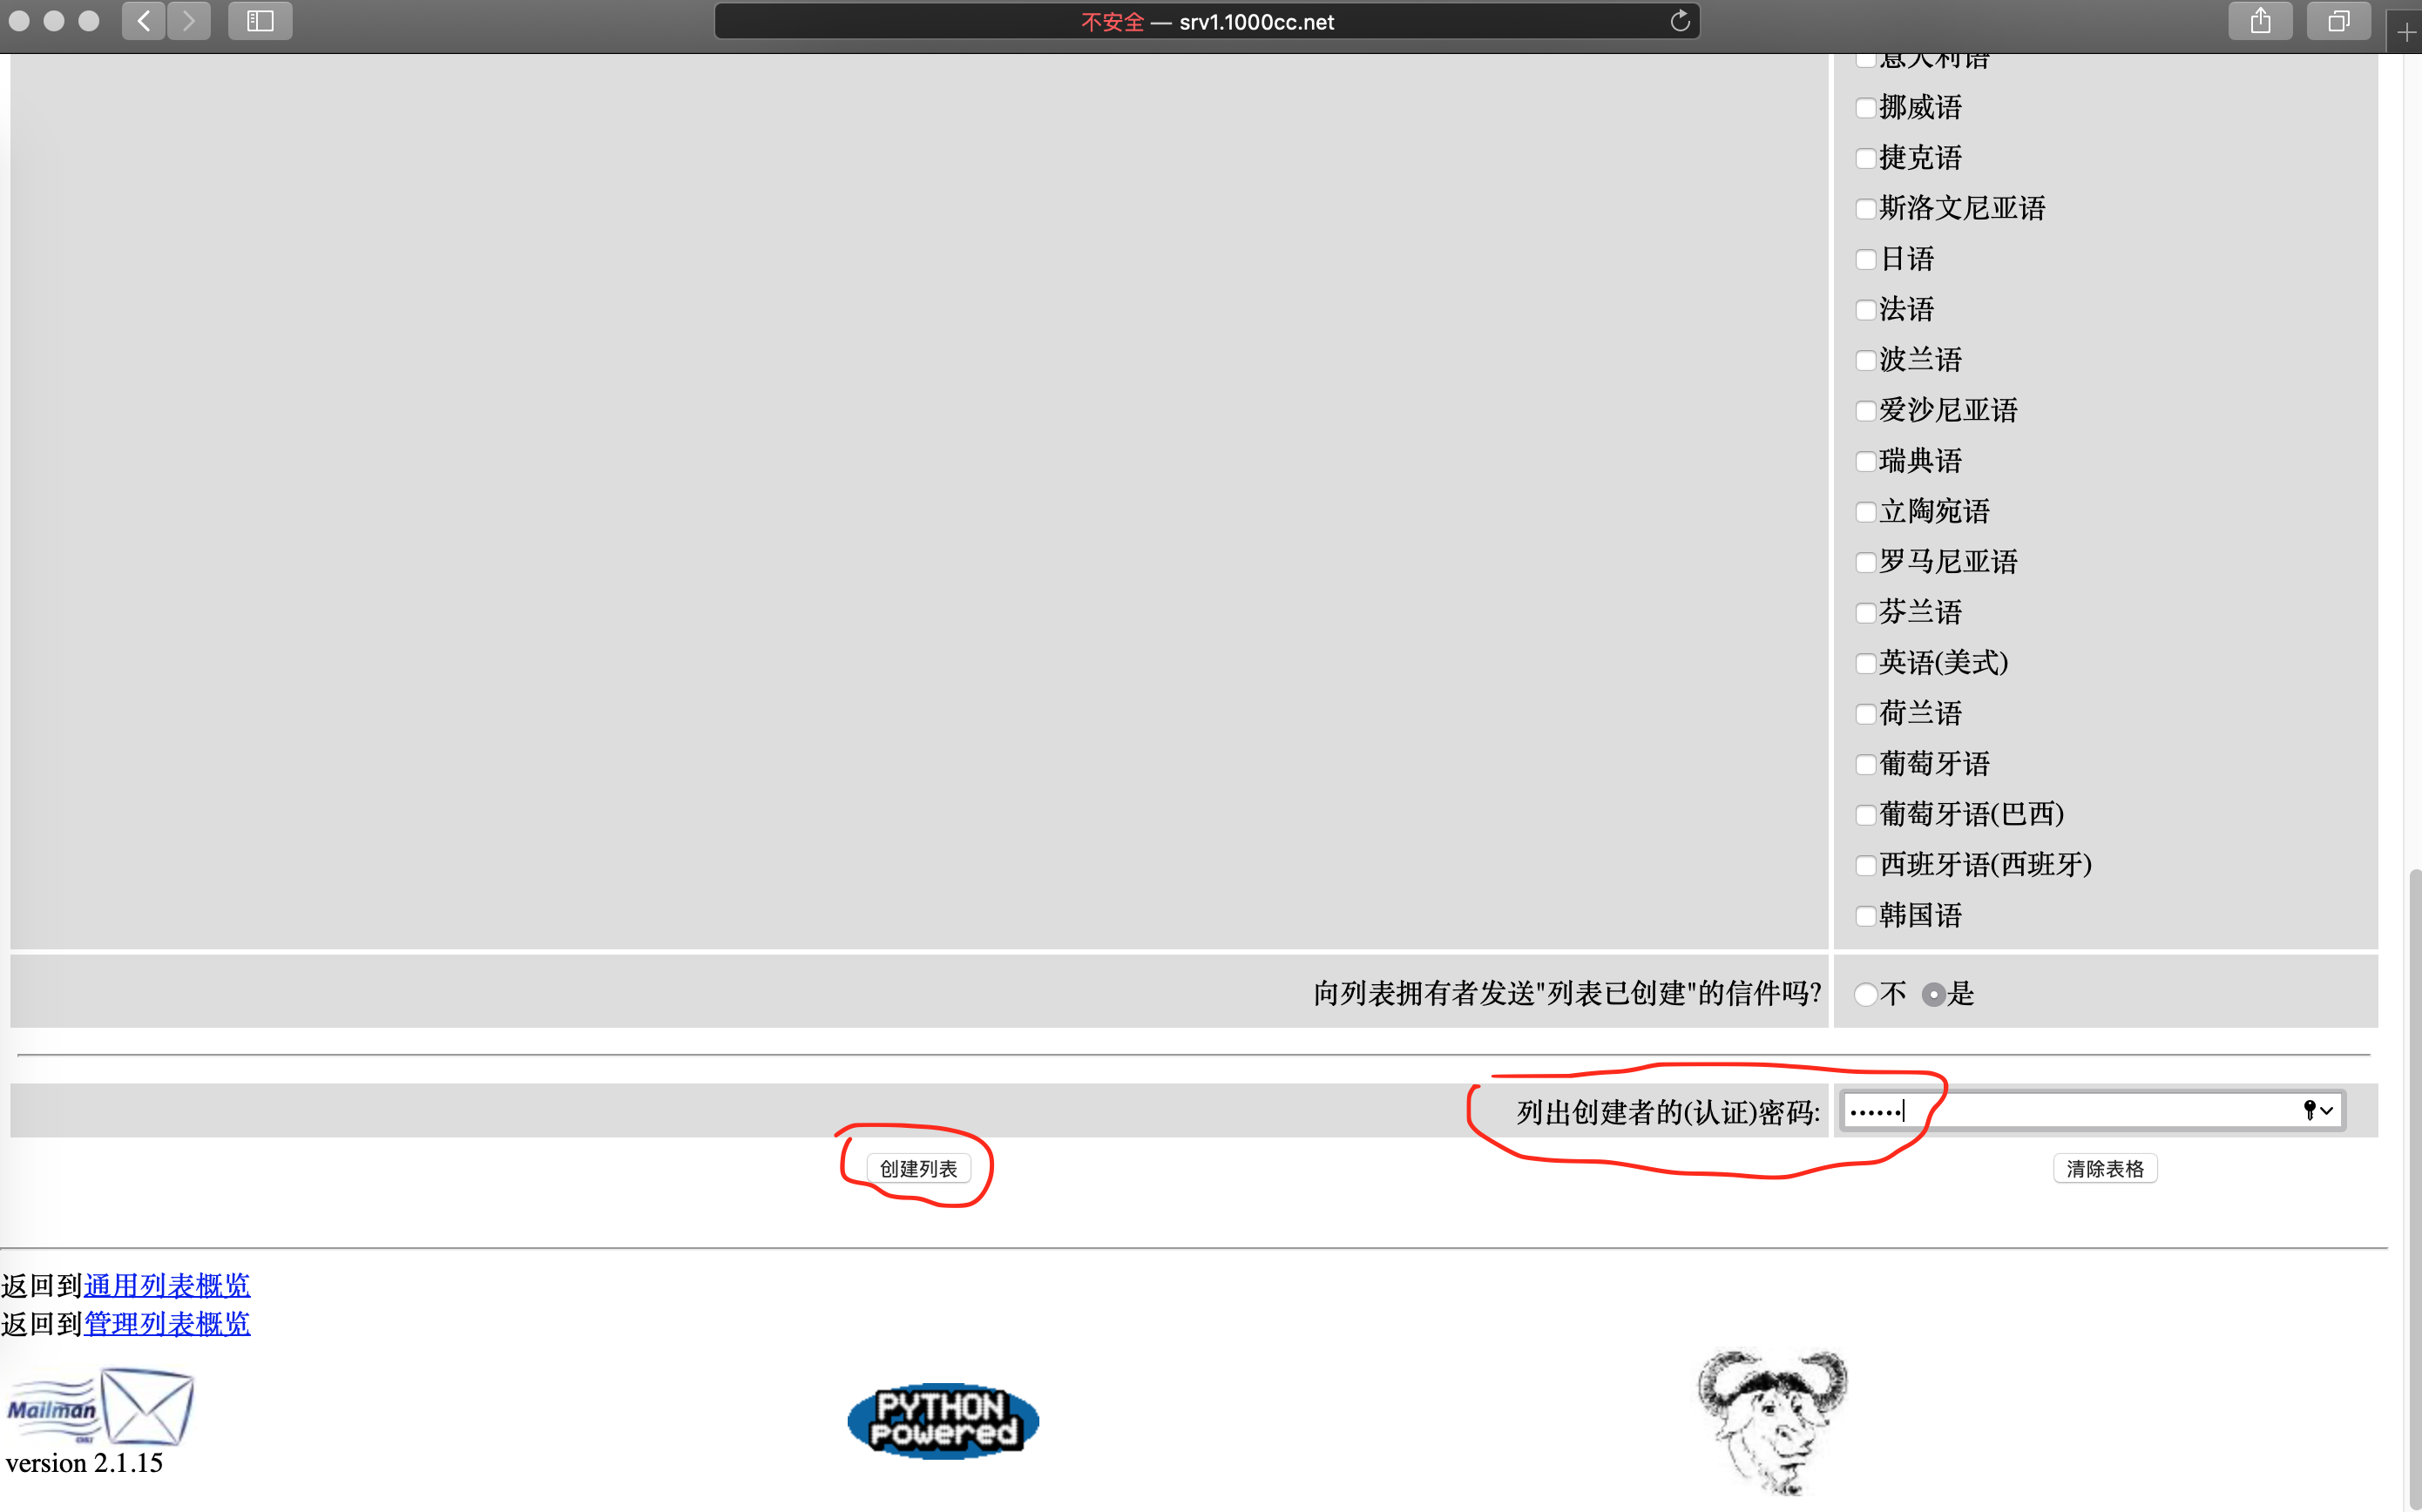
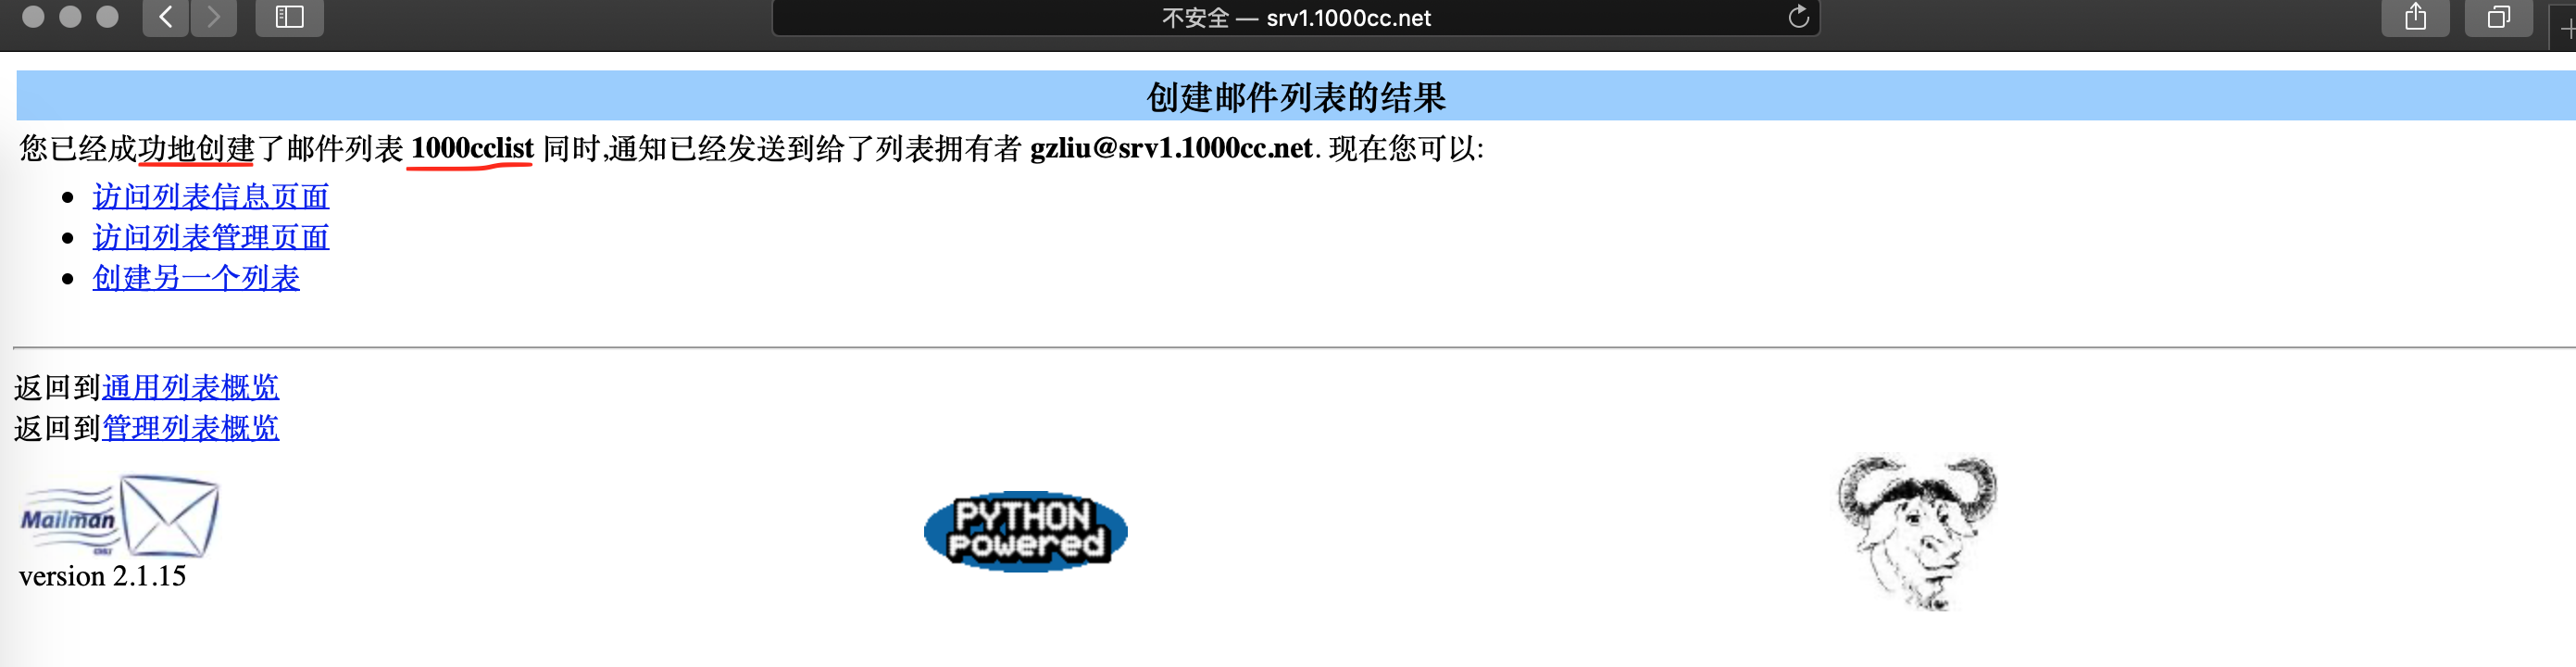
# 创建管理列表 [root@srv1 ~]# /usr/lib/mailman/bin/newlist mailman Enter the email of the person running the list: mailman@srv1.1000cc.net Initial mailman password: Hit enter to notify mailman owner...
[root@srv1 ~]# systemctl enable --now mailman
3) 配置Posftfix [root@srv1 ~]# vim /etc/postfix/main.cf # 于386行,追加如下内容 alias_maps = hash:/etc/aliases, hash:/etc/mailman/aliases
# 于397行,追加如下内容 alias_database = hash:/etc/aliases, hash:/etc/mailman/aliases
[root@srv1 ~]# systemctl restart postfix httpd [root@srv1 ~]# systemctl enable httpd10.2 访问Mailman

11. 使用WebMail
11.1 配置http及php环境
[root@srv1 ~]# vim /etc/php.ini # 取消878行注释,并定义时区 date.timezone = "Asia/Shanghai"
[root@srv1 ~]# systemctl restart httpd11.2 实现https
2) 移除passphrase [root@srv1 certs]# openssl rsa -in server.key -out server.key Enter pass phrase for server.key: writing RSA key
3) 生成csr [root@srv1 certs]# make server.csr umask 77 ; \ /usr/bin/openssl req -utf8 -new -key server.key -out server.csr You are about to be asked to enter information that will be incorporated into your certificate request. What you are about to enter is what is called a Distinguished Name or a DN. There are quite a few fields but you can leave some blank For some fields there will be a default value, If you enter '.', the field will be left blank. ----- Country Name (2 letter code) [XX]: CN State or Province Name (full name) []: BeiJing Locality Name (eg, city) [Default City]: BeiJing Organization Name (eg, company) [Default Company Ltd]: 1000cc.net Organizational Unit Name (eg, section) []: tech Common Name (eg, your name or your server's hostname) []: srv1.1000cc.net Email Address []:# 回车
Please enter the following 'extra' attributes to be sent with your certificate request A challenge password []:# 回车 An optional company name []:# 回车
4) 生成证书 [root@srv1 certs]# openssl x509 -in server.csr -out server.crt -req -signkey server.key -days 365 Signature ok subject=/C=CN/ST=BeiJing/L=BeiJing/O=1000cc.net/OU=tech/CN=srv2.1000cc.net Getting Private key
[root@srv1 certs]# cd
5) 配置Apache SSL功能 [root@srv1 ~]# yum install mod_ssl -y
[root@srv1 ~]# vim /etc/httpd/conf.d/ssl.conf # 取消59-60行注释,并修改为如下内容 DocumentRoot "/var/www/html" ServerName srv1.1000cc.net:443
# 修改75行为如下内容 SSLProtocol -All +TLSv1 +TLSv1.1 +TLSv1.2
# 修改100,107,116三行,并取消注释。修改为如下内容 SSLCertificateFile /etc/pki/tls/certs/server.crt SSLCertificateKeyFile /etc/pki/tls/certs/server.key SSLCertificateChainFile /etc/pki/tls/certs/server.crt
6) 配置http自动转为https功能 [root@srv2 ~]# vim /etc/httpd/conf.d/vhost.conf <VirtualHost *:80> DocumentRoot /var/www/html ServerName srv1.1000cc.net RewriteEngine On RewriteCond %{HTTPS} off RewriteRule ^(.*)$ https://%{HTTP_HOST}%{REQUEST_URI} [R=301,L] </VirtualHost>
[root@srv1 ~]# systemctl restart httpd11.3 配置MariaDB
[root@srv1 ~]# vim /etc/my.cnf # 于[mysqld]最尾部追加如下内容: character-set-server=utf8
[root@srv1 ~]# systemctl enable --now mariadb
2) 初始化MariaDB [root@srv1 ~]# mysql_secure_installation
NOTE: RUNNING ALL PARTS OF THIS SCRIPT IS RECOMMENDED FOR ALL MariaDB SERVERS IN PRODUCTION USE! PLEASE READ EACH STEP CAREFULLY! In order to log into MariaDB to secure it, we'll need the current password for the root user. If you've just installed MariaDB, and you haven't set the root password yet, the password will be blank, so you should just press enter here.
Enter current password for root (enter for none): # enter OK, successfully used password, moving on...
Setting the root password ensures that nobody can log into the MariaDB root user without the proper authorisation.
Set root password? [Y/n] y # 设置root密码 New password: Re-enter new password: Password updated successfully! Reloading privilege tables.. ... Success!
By default, a MariaDB installation has an anonymous user, allowing anyone to log into MariaDB without having to have a user account created for them. This is intended only for testing, and to make the installation go a bit smoother. You should remove them before moving into a production environment.
Remove anonymous users? [Y/n] y # 移除anonymous账户 ... Success!
Normally, root should only be allowed to connect from 'localhost'. This ensures that someone cannot guess at the root password from the network.
Disallow root login remotely? [Y/n] y # 禁用root远程登录 ... Success!
By default, MariaDB comes with a database named 'test' that anyone can access. This is also intended only for testing, and should be removed before moving into a production environment.
Remove test database and access to it? [Y/n] y # 移除test数据库 - Dropping test database... ... Success! - Removing privileges on test database... ... Success!
Reloading the privilege tables will ensure that all changes made so far will take effect immediately.
Reload privilege tables now? [Y/n] y # 重新加载privilege ... Success!
Cleaning up...
All done! If you've completed all of the above steps, your MariaDB installation should now be secure.
Thanks for using MariaDB!
3) 测试MariaDB连接 [root@srv1 ~]# mysql -u root -p Enter password: # 输入密码 Welcome to the MariaDB monitor. Commands end with ; or \g. Your MariaDB connection id is 16 Server version: 10.1.20-MariaDB MariaDB Server
Copyright (c) 2000, 2018, Oracle, MariaDB Corporation Ab and others.
Type 'help;' or '\h' for help. Type '\c' to clear the current input statement.
MariaDB [(none)]> select user,host,password from mysql.user; +------+-----------+-------------------------------------------+ | user | host | password | +------+-----------+-------------------------------------------+ | root | localhost | *6BB4837EB74329105EE4568DDA7DC67ED2CA2AD9 | | root | 127.0.0.1 | *6BB4837EB74329105EE4568DDA7DC67ED2CA2AD9 | | root | ::1 | *6BB4837EB74329105EE4568DDA7DC67ED2CA2AD9 | +------+-----------+-------------------------------------------+ 3 rows in set (0.00 sec)
MariaDB [(none)]> show databases; +--------------------+ | Database | +--------------------+ | information_schema | | mysql | | performance_schema | +--------------------+ 3 rows in set (0.00 sec)
MariaDB [(none)]> exit Bye [root@srv1 ~]#
4) 防火墙规则设定 [root@srv1 ~]# firewall-cmd --add-service=mysql --permanent success [root@srv1 ~]# firewall-cmd --reload success11.4 创建RoundCube数据库
Copyright (c) 2000, 2016, Oracle, MariaDB Corporation Ab and others.
Type 'help;' or '\h' for help. Type '\c' to clear the current input statement.
MariaDB [(none)]> create database roundcube; Query OK, 1 row affected (0.00 sec)
MariaDB [(none)]> grant all privileges on roundcube.* to roundcube@'localhost' identified by 'password'; Query OK, 0 rows affected (0.00 sec)
MariaDB [(none)]> grant all privileges on roundcube.* to roundcube@'%' identified by 'password'; Query OK, 0 rows affected (0.00 sec)
MariaDB [(none)]> flush privileges; Query OK, 0 rows affected (0.00 sec)
MariaDB [(none)]> exit Bye11.5 安装与配置RoundCube
2) 导入RoundCube数据 [root@srv1 ~]# cd /usr/share/roundcubemail/SQL [root@srv1 SQL]# mysql -u roundcube -D roundcube -p < mysql.initial.sql Enter password: # 输入roundcube数据库账户的密码 [root@srv1 SQL]# cd [root@srv1 ~]#
3) 配置RoundCube [root@srv1 ~]# cp -p /etc/roundcubemail/defaults.inc.php /etc/roundcubemail/config.inc.php
[root@srv1 ~]# vim /etc/roundcubemail/config.inc.php # 修改27行,设定数据库的相关信息 $config['db_dsnw'] = 'mysql://roundcube:password@localhost/roundcube';
# 修改127行,指定IMAP Server的信息 $config['default_host'] = 'tls://srv1.1000cc.net';
# 修改130行,指定IMAP Server的端口的信息 $config['default_port'] = 143;
# 修改232行,指定STMP Server信息 $config['smtp_server'] = 'tls://srv1.1000cc.net';
# 修改236行,指定STMP Server的端口的信息 $config['smtp_port'] = 587;
# 修改240行,设定对IMAP及SMTP使用同一账户 $config['smtp_user'] = '%u';
# 修改244行,设定对IMAP及SMTP使用同一账户 $config['smtp_pass'] = '%p';
# 修改248行,设定STMP验证类型 $config['smtp_auth_type'] = 'LOGIN';
# 修改260行,设定STMP HELO主机 $config['smtp_helo_host'] = 'srv1.1000cc.net';
# 修改449行,设定域名 $config['mail_domain'] = '1000cc.net';
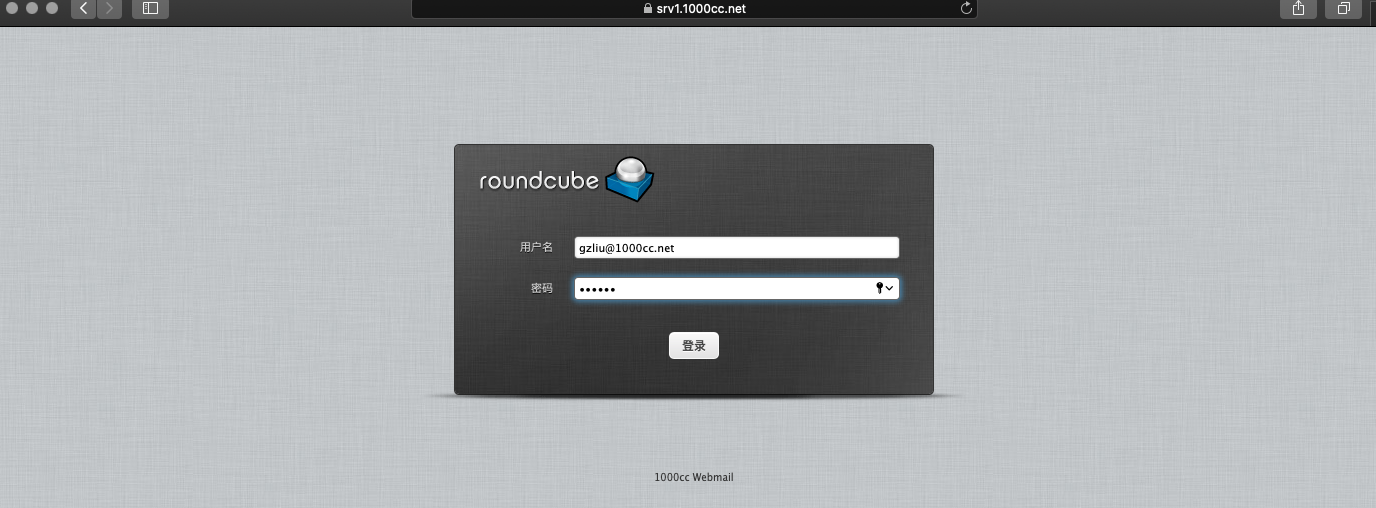
# 修改467行,设定标题 $config['product_name'] = '1000cc Webmail';
# 修改470行,更改UserAgent $config['useragent'] = '1000cc Webmail';
# 修改602行,更改语言 $config['language'] = zh_CN;
# 修改953行,更改字符集编码 $config['default_charset'] = 'UTF-8';
[root@srv1 ~]# vim /etc/httpd/conf.d/roundcubemail.conf ...... ...... Require local # 于14行添加如下内容 Require ip 192.168.10.0/24 </IfModule> ...... ......
[root@srv1 ~]# systemctl restart httpd
4) 设定SELinux [root@srv1 ~]# setsebool -P httpd_can_network_connect on11.6 为RoundCube自动生成邮件所需要的分类箱
[root@srv1 ~]# vim /etc/dovecot/conf.d/20-imap.conf
......
......
protocol imap {
   # Space separated list of plugins to load (default is global mail_plugins).
   # 修改87行,修改内容如下
   mail_plugins = $mail_plugins autocreate
......
......

# 于文件底部追加如下内容
mail_plugins = plugin {
  autocreate = Trash
  autocreate2 = Junk
  autocreate3 = Drafts
  autocreate4 = Sent
  autosubscribe = Trash
  autosubscribe2 = Junk
  autosubscribe3 = Drafts
  autosubscribe4 = Sent
}

[root@srv1 ~]# systemctl restart dovecot
11.7 访问RoundCube